

Why This Sugar Free Mini Cheesecake Turns Out Bakery-Style Every Time
This Sugar Free Mini Cheesecake recipe uses simple, reliable ratios so you get that classic bakery texture without added sugar. The almond flour crust brings a buttery crunch and a light nutty flavor that balances the rich filling, while also holding together well in standard cupcake liners. Baking the crust briefly before adding the filling keeps it from turning soggy and gives each mini cheesecake a clean, distinct base. The combination of softened cream cheese, sour cream, and a touch of lemon juice creates a smooth batter that bakes up with a tender center and just-set edges. Using a granular sugar alternative mimics the structure of regular sugar, so the cheesecakes hold their shape, slice neatly, and still taste like a classic treat.
The method is designed for consistency and ease, even if you do not bake often. Portioning the batter into a cupcake pan means faster baking and more even cooking than a full-size cheesecake, with no water bath or guesswork. You simply pull them when the edges are set and the centers still jiggle slightly; they finish setting as they cool. Chilling time is shorter, too, so you can have a tray of Sugar Free Mini Cheesecake ready the same day. The whipped cream topping and fresh berries add a light, bright finish that cuts through the richness and lets each person customize their dessert. If you enjoy balanced, lower-sugar desserts like mini key lime pies or ricotta baked cheesecake cups, this recipe gives you that same control and satisfaction in a familiar, crowd-pleasing format.
How to Make These Sugar Free Mini Cheesecakes Step-by-Step
Start by getting the texture right from the bottom up. Preheat your oven to 350°F and line a standard 12-cup muffin pan with sturdy paper liners so the Sugar Free Mini Cheesecake crust releases cleanly. In a bowl, stir together the almond flour, melted butter, and granular sweetener until the mixture looks like damp sand and holds when you pinch it. Divide this mixture evenly between the liners, then press it firmly into a flat, even layer using the bottom of a small glass or measuring cup. Bake the crusts for about 5 minutes, just until they look slightly set and smell toasty, then let them cool while you mix the filling so the bottoms stay crisp instead of soggy.
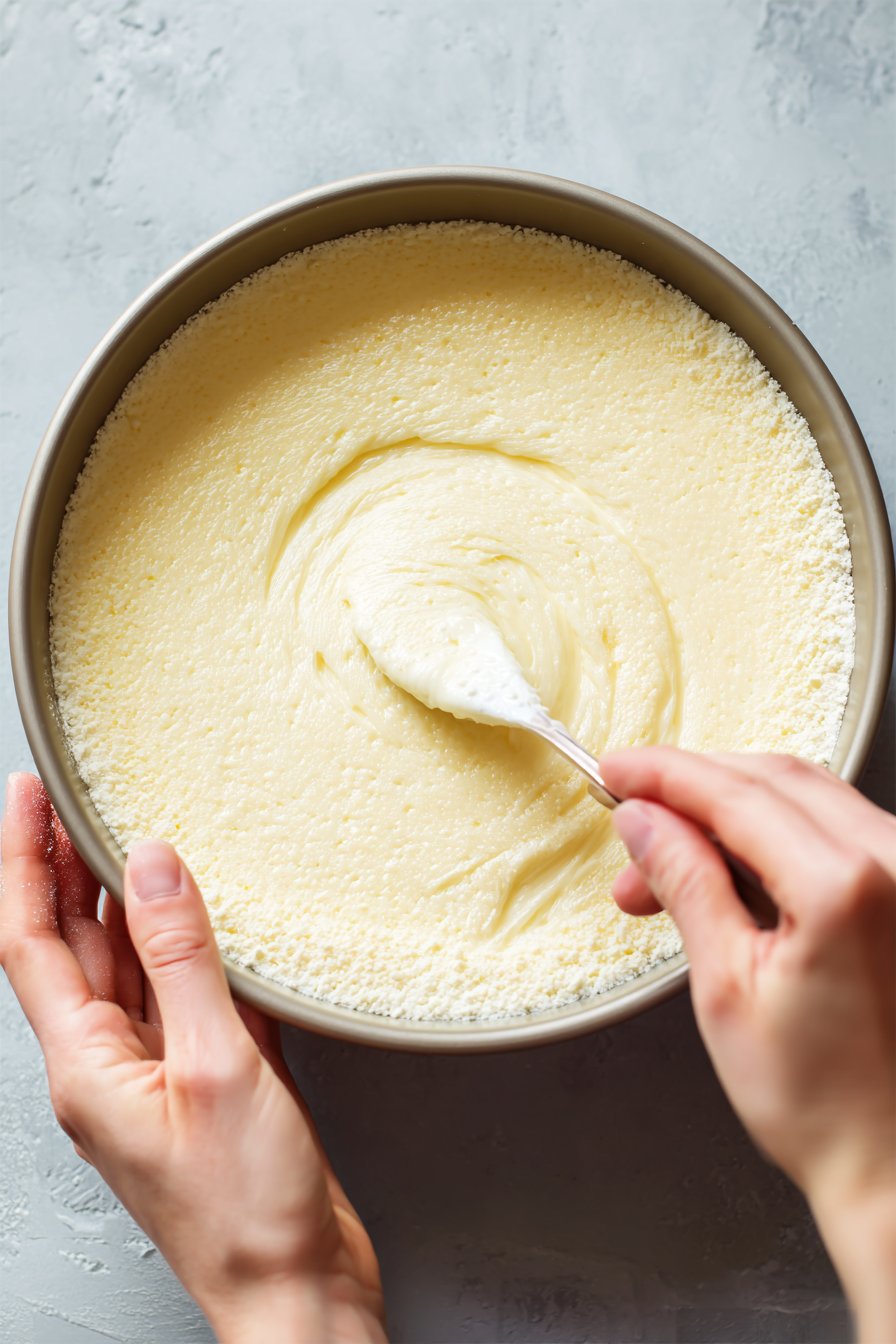
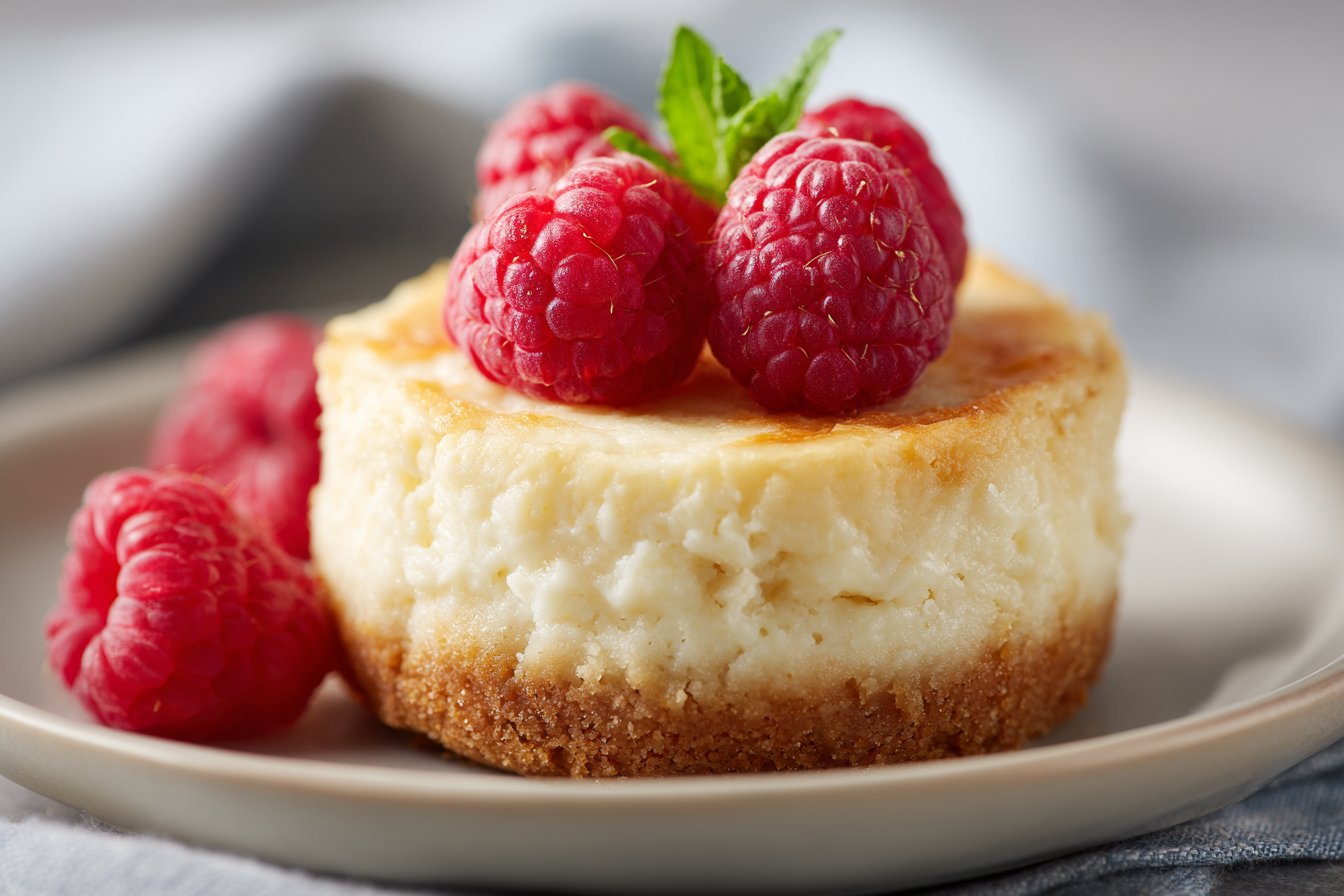
For the filling, make sure your cream cheese is truly softened so it blends smooth without lumps. Beat the cream cheese with the granular sugar alternative until it’s creamy and no gritty bits remain, then mix in the sour cream, lemon juice, and vanilla bean paste for a balanced, bright flavor. Add the eggs one at a time, mixing on low just until combined to avoid whipping in too much air (air is what causes cracked tops). Scoop the batter evenly over the cooled crusts, filling each liner almost to the top. Bake 12–15 minutes, until the edges look set but the centers still wobble slightly—if they look fully firm, they’re overdone, and the texture will be dry instead of silky. Cool completely in the pan, then chill to fully set. Right before serving, whip the cold heavy cream with powdered sugar-free sweetener until stiff peaks form, pipe or spoon it over each Sugar Free Mini Cheesecake, and finish with fresh berries for color, sweetness, and a clean, bakery-style look.
Time, Prep, and Storage Plan for Sugar Free Mini Cheesecake
This Sugar Free Mini Cheesecake recipe fits comfortably into about 40 minutes of active time, plus cooling. Plan for 20 minutes to prep the almond crust and creamy filling, and another 20 minutes to bake and whip the topping. The longest “silent” part is cooling: allow at least 1 hour at room temperature, then another 1–2 hours in the refrigerator so the centers fully set. If you like to work ahead, you can mix the almond crust and cheesecake batter up to a day in advance, store them covered in the fridge, and assemble and bake when you’re ready. You can also whip the cream right before serving for the best texture and clean, defined peaks.
For storage, cool your Sugar Free Mini Cheesecake completely, then cover the pan tightly with plastic wrap or transfer the cheesecakes to an airtight container. They keep well in the refrigerator for 4–5 days, and the texture actually improves after the first chill as the flavors meld. Add the whipped cream and fresh fruit just before serving, especially if you’re using juicy berries, to keep the topping from slipping. If you want to freeze them, skip the fruit and whipped cream; freeze the baked and cooled minis on a tray until firm, then wrap each one and store in a freezer bag for up to 2 months. Thaw overnight in the refrigerator, then top with whipped cream, berries, or even a drizzle from another dessert recipe like a sugar free berry sauce just before serving.
Flexible Options and Serving Notes for Sugar Free Mini Cheesecake
Mini cheesecakes are wonderfully forgiving, and this Sugar Free Mini Cheesecake is easy to adapt to what you have on hand. For the crust, you can swap almond flour with a mix of almond and pecan or walnut meal for a deeper, almost toasty flavor; just keep the total amount the same and watch the color closely as nuts can brown fast. If you need these cheesecakes nut-free, use a finely ground seed mix (like sunflower seed flour) or a sugar-free cookie crumb, then reduce the butter slightly if the mixture looks greasy rather than damp and sandy. In the filling, cream cheese is the star, but you can replace up to one quarter with full-fat ricotta or Greek yogurt for a lighter texture—just expect a slightly softer set. Any granular sugar alternative that measures 1:1 with sugar should work, but if yours tastes very sweet, start with a tablespoon less and adjust next time. For the topping, you can skip the whipped cream entirely and serve these plain, or add just a thin dollop to keep the overall dessert lighter.
You can easily dress this Sugar Free Mini Cheesecake up or down depending on the occasion. For a simple weeknight dessert, top with a few sliced strawberries or blueberries and serve straight from the fridge. For a more polished presentation, use a piping bag and star tip to swirl the whipped cream, then add mixed berries, a few toasted almonds, or a drizzle of a homemade sugar-free berry sauce. These keep well, so I like to make a batch ahead and store them in an airtight container in the refrigerator for up to 4 days; wait to add whipped cream and fruit until shortly before serving so everything stays fresh. To serve for a gathering, arrange them on a flat platter, alternating different toppings (all berries, just raspberries, or a lemon-zest-only version) so guests can choose their favorite. If you enjoy this style of portion-controlled dessert, you might also like converting flavors from your favorite mini key lime pie or peanut butter cheesecake into this same easy, oven-baked mini format.

Serving of Sugar Free Mini Cheesecake
Conclusion
These little cheesecakes prove that you don’t have to choose between feeling good and enjoying dessert. A tray of Sugar Free Mini Cheesecake cooling on the counter has a way of bringing people into the kitchen—curious kids, hungry partners, and friends who “weren’t going to have dessert” but suddenly find a fork in their hand. It’s the kind of recipe that turns an ordinary evening into something a little more special.
I love that you can bake these ahead, chill them, and have a mini celebration ready whenever you need it—after-dinner, after-school, or after a long day. Each bite feels like a small, intentional pause: creamy center, soft crust, and any topping you love. If you’re newer to baking, this is a very forgiving place to start. If you’ve been baking for years, it’s one of those reliable go-tos you’ll quietly make on repeat.
I hope you’ll bookmark this recipe, try it soon, and share it with someone you love.
For more delicious recipes like this, follow us on social media!
Instructions Process of Sugar Free Mini Cheesecake
What makes this Sugar Free Mini Cheesecake truly sugar free?
This Sugar Free Mini Cheesecake uses a granular sugar alternative in both the almond flour crust and the creamy filling instead of regular sugar. The whipped cream topping uses a powdered sugar substitute as well, so you avoid added sugar in every layer. You still get sweetness and structure, just without the blood sugar spike. For the best results, use a sweetener that clearly says it measures 1:1 like sugar. Always check labels to avoid hidden sugars in powdered sweeteners and toppings.
Which sugar alternatives work best in this recipe?
A 1:1 granular sugar substitute such as erythritol, allulose, or a monk fruit blend works best for this Sugar Free Mini Cheesecake. These options dissolve well in the filling and help the crust hold together. Avoid pure stevia on its own, as it can taste bitter and does not provide bulk. Different brands vary in sweetness, so taste your filling before baking and adjust by a tablespoon at a time if needed. For the whipped cream, use a sugar free powdered sweetener to avoid a grainy texture.
Can I make, chill, or freeze Sugar Free Mini Cheesecake ahead of time?
You can fully bake these mini cheesecakes, cool them, and refrigerate them for up to 4–5 days before serving. For the cleanest texture, add whipped cream and fruit just before serving or within 1 day. If you want to freeze them, skip the toppings and freeze the cooled cheesecakes on a tray, then transfer them to an airtight container. They keep well in the freezer for up to 2 months. Thaw overnight in the refrigerator, then top and serve chilled.
Recipe
Sugar Free Mini Cheesecake
Ingredients
Method
- Preheat the oven to 350°F and line a 12-cup muffin pan with paper cupcake liners.
- In a medium bowl, combine the almond flour, 3 tablespoons granular sweetener, and melted butter, stirring until the mixture is evenly moistened and clumps together.
- Divide the crust mixture evenly among the 12 liners and press firmly into the bottom of each cup to form a compact, even layer.
- Bake the crusts for 5 minutes, then remove the pan from the oven and let the crusts cool while you prepare the filling.
- In a large mixing bowl, beat the softened cream cheese and 1/3 cup granular sweetener together until smooth and creamy with no lumps.
- Add the sour cream, lemon juice, and vanilla bean paste to the cream cheese mixture and beat until fully combined and smooth.
- Add the eggs one at a time, mixing on low speed just until each egg is incorporated and the batter is smooth, without overbeating.
- Divide the filling evenly over the cooled crusts, filling each liner almost to the top.
- Return the pan to the oven and bake for 12 to 15 minutes, until the edges are set and the centers still have a slight jiggle when gently shaken.
- Remove the pan from the oven and let the mini cheesecakes cool completely in the pan at room temperature.
- Transfer the cooled cheesecakes to the refrigerator and chill for at least 1 to 2 hours, or until fully set.
- Just before serving, place the cold heavy cream and powdered sweetener in a chilled mixing bowl and whip on high speed for about 3 minutes, or until stiff peaks form.
- Remove the chilled mini cheesecakes from the liners if desired, then top each with a dollop or piped swirl of whipped cream.
- Finish each mini cheesecake with fresh berries on top and serve chilled.
Notes
- Make sure the cream cheese is fully softened to avoid lumps in the batter.
- Do not overbake; the centers should still jiggle slightly when you take them out of the oven.
- These mini cheesecakes keep well covered in the refrigerator for up to 4 days.
- For a firmer whipped cream topping, chill the bowl and beaters before whipping the cream.
