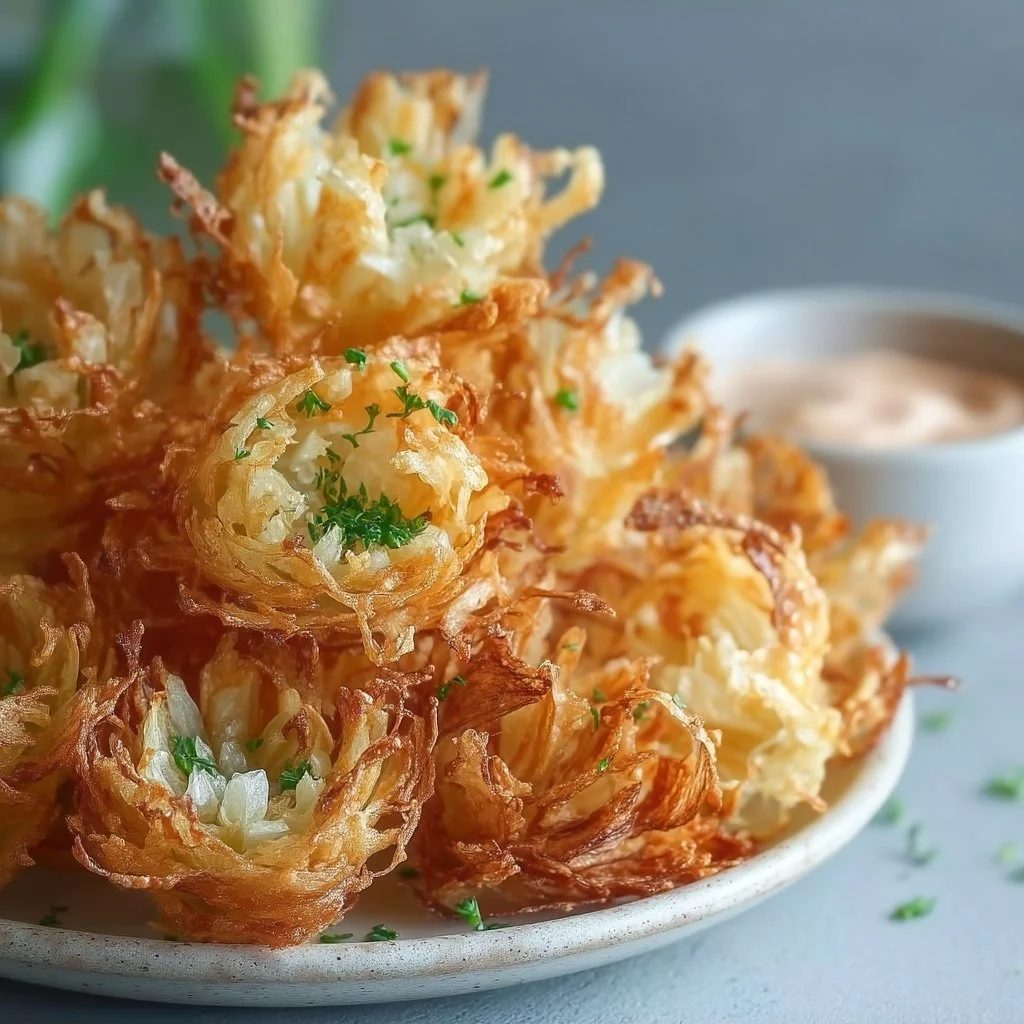
The moment I start craving something snacky and crunchy, I think about onion rings—but I don’t want to deal with a big pot of oil or a sink full of splatter. These air fryer mini blooming onions hit that same savory, crispy note with a lot less mess, and they’re small enough to cook quickly and evenly.
This recipe is especially useful when you want a warm appetizer-style snack that feels a little “fun,” but still fits into a normal evening. The buttermilk helps the coating cling, the spice mix brings that classic steakhouse vibe, and the air fryer gets you crisp edges without deep-frying. If you already rely on the air fryer for meals like crispy air fryer chicken parmesan, this technique will feel very familiar.
Why This Recipe Works
- Buttermilk (or quick soured milk) improves cling so the flour-spice coating actually stays on the onion petals instead of sliding off in the basket.
- Sweet onions (like Vidalia) soften nicely and balance the paprika, garlic, and cayenne with a mild natural sweetness.
- The spice blend is built into the flour so every bite is seasoned—no bland interior with only salty “surface” flavor.
- Air frying + a light oil spray gives you crisp edges and browned high points without deep-frying or heavy cleanup.
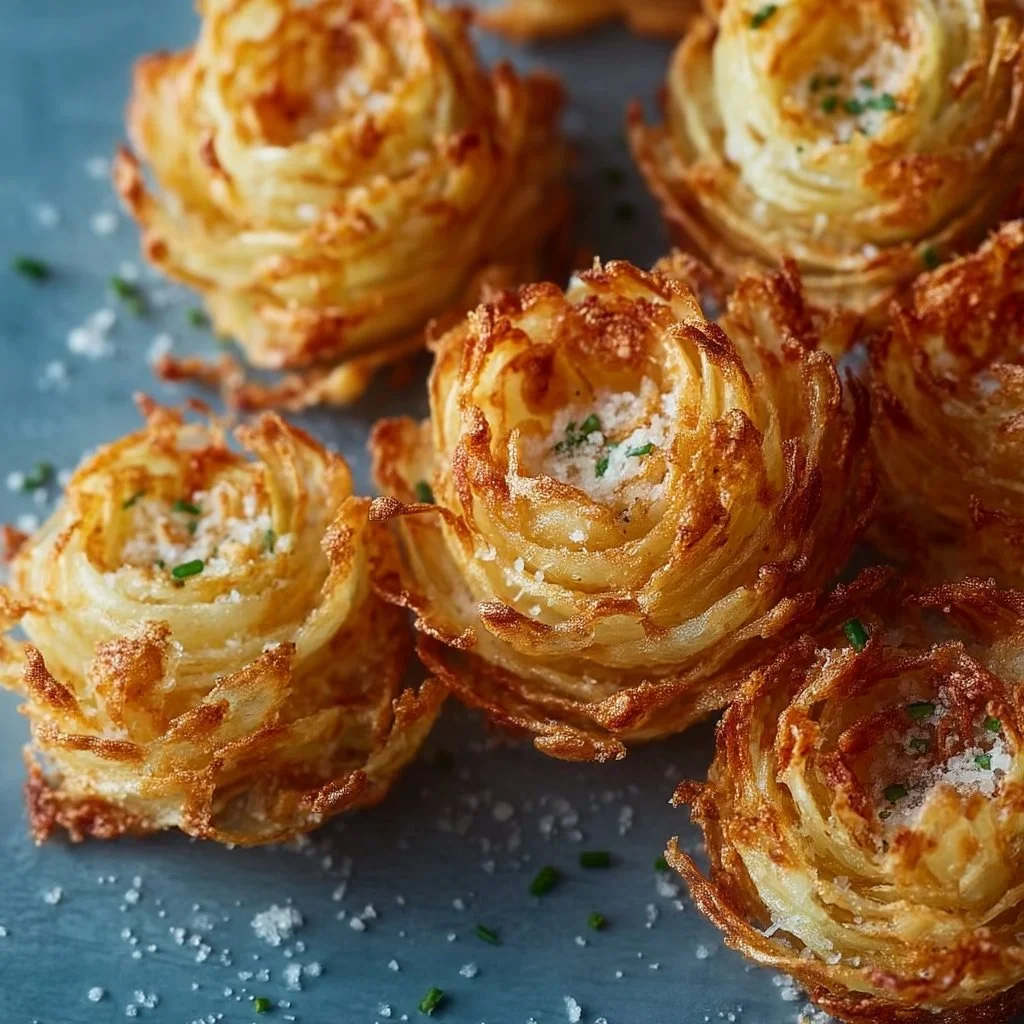
- Mini size cooks more evenly than a whole giant onion—more surface area for crunch, less chance of an undercooked center.
- Gluten-free flour works here because the coating is simple and flour-forward; you’re not relying on a complex batter structure.
Quick Kitchen Note
I make these when I want something crunchy that doesn’t require a full appetizer spread—just onions, a seasoned flour mix, and the air fryer doing its job. They’re also a good “use what you’ve got” recipe since the spices are pantry staples and the buttermilk can be swapped for milk with lemon juice.
What It Tastes Like
You get tender-sweet onion in the middle with crisp, paprika-tinted edges on the outside. The garlic and onion powders lean savory, the cayenne adds a gentle heat (or more, if you like), and the finish is peppery and salty—like onion ring flavor, but with more nooks and crunchy tips.
Ingredients
This ingredient list is short on purpose: a quick soak (buttermilk or milk + lemon) helps the flour coating stick, and the flour plus spices makes a dry dredge that browns well in the air fryer. If you need it, gluten-free flour is a practical swap here—keep everything else the same and focus on getting an even coat and a light spray of oil for best crisping.
- 1 cup Buttermilk (or milk with lemon juice)
- 1 cup Flour (substitute with gluten-free flour for a gluten-free option)
- 1 tbsp Paprika (consider using smoked paprika for extra flavor)
- 1 tsp Garlic Powder
- 1 tsp Onion Powder
- 0.5 tsp Cayenne Pepper (adjust according to taste)
- 1 tsp Salt
- 1 tsp Pepper
- 2 medium Sweet Onions (like Vidalia)
- as needed Cooking Spray/Oil (for crispy exterior)
Step-by-Step Instructions
- Mix the buttermilk soak. Pour the buttermilk (or your milk mixed with lemon juice) into a medium bowl—wide enough to dip and turn onion pieces easily.
- Make the seasoned flour. In a separate bowl, combine the flour, paprika, garlic powder, onion powder, cayenne, salt, and pepper. Stir well so the spices are evenly distributed—this is what keeps the coating from tasting patchy.
- Prep the onions into “mini blooms.” Peel the sweet onions. Cut them into smaller bloom-style portions (mini size). The goal is lots of exposed edges and “petals” so the coating can settle into the cuts and crisp up.
- Soak the onion pieces. Dip the onion portions into the buttermilk, turning to coat. Let excess drip off—wet is good, but you don’t want it pouring into the flour bowl.
- Dredge in seasoned flour. Press the damp onion pieces into the flour mixture, turning and gently pressing so the flour gets into the cuts and along the edges. If you see bare spots, tap on a little more flour until the surface looks evenly coated.
- Oil for crisping. Lightly coat the outside with cooking spray or a small amount of oil. This is what helps the flour go from powdery to crisp and browned in the air fryer.
- Air fry in a single layer. Place the coated mini blooming onions in the air fryer basket with a little space between pieces (so hot air can circulate). If your basket is small, cook in batches rather than stacking.
- Cook until crisp and browned. Air fry until the coating looks set and dry (not floury), with deeper color on the ridges and tips. The onion should be tender when you pierce a thicker section, but still hold its shape.
- Serve right away. These are at their crunchiest in the first few minutes after cooking. If you’re making multiple batches, keep the first batch loosely arranged (not piled) while the next one cooks so it stays crisp.
Common Mistakes to Avoid
- Cutting onions too thick: Thick pieces stay crunchy-on-the-outside but undercooked inside. Fix: Aim for mini portions with plenty of “petals” and exposed edges.
- Not pressing flour into the cuts: The best crunchy bits happen in the creases. Fix: After dredging, gently press the flour mixture into the onion’s cuts before oiling.
- Skipping the oil spray: Flour needs a little fat to brown and crisp in the air fryer. Fix: Use cooking spray/oil lightly but thoroughly on the outer surface.
- Overcrowding the basket: Crowding traps steam and softens the coating. Fix: Cook in a single layer; batch cook if needed.
- Overdoing the cayenne: It can quickly overpower the sweet onion. Fix: Keep it mild the first time, then increase on the next batch if you want more heat.
Variations and Swaps
- Smokier flavor: Use smoked paprika instead of regular paprika for a deeper, grill-adjacent vibe.
- Gluten-free option: Swap in gluten-free flour; focus on an even dredge and a good oil spray for browning.
- Heat control: Reduce cayenne for a milder batch, or increase slightly if you want the spice to land earlier on the palate.
- Different onion choice (still sweet): Stick with sweet onions when possible—their softer bite and mildness work best with this seasoning.
Serving Suggestions
Serve these as a warm snack, or alongside a simple dinner spread where you want something crunchy and savory. They also fit nicely next to air fryer staples—if you’re already making something sweet like cinnamon-sugar air fryer banana chips for a mixed snack board, these bring the salty counterpoint. For a playful air fryer night, pair with something bite-sized like healthy air fryer churro bites so you’re using the same appliance without juggling extra pans.
Storage and Meal Prep
These mini blooming onions are best eaten right after air frying—crispness fades as they sit. If you do have leftovers, store them in the fridge in a container that isn’t completely airtight (a little airflow helps prevent sogginess). Reheat in the air fryer until the coating looks re-crisped and dry again; avoid microwaving, which makes the coating soft.
For prep, you can mix the seasoned flour ahead of time and keep it ready at room temperature. I don’t recommend coating the onions far in advance—the flour will hydrate and turn pasty before it ever hits the air fryer.

FAQs
Can I make these without buttermilk?
Yes. Use milk with lemon juice as listed—it gives you a similar tang and helps the coating stick.
How do I keep the coating from falling off?
Let excess buttermilk drip off, then press the flour mixture into the cuts and edges. A light oil spray after dredging also helps set the coating.
Why are mine not crispy?
Most often it’s either not enough oil spray or an overcrowded basket. Spray the surface well and cook in batches so air can circulate.
Can I use gluten-free flour?
Yes—use gluten-free flour as noted. Make sure the coating is even and oil-sprayed so it browns instead of staying powdery.
Final Tip
When you dredge, take an extra 10 seconds to open the “petals” slightly and get seasoned flour into the cuts—those creases are where the crispiest bits form, and it’s what makes these taste like a mini blooming onion instead of a plain coated onion chunk.
Conclusion
If you want to keep exploring blooming-onion-style snacks, it’s helpful to compare a few approaches and coatings—this recipe stays intentionally simple, but you can learn a lot by looking at ideas like a classic crispy air fryer blooming onion, a different format like blooming onion petals, or a roundup for more inspiration such as easy air fryer blooming onion recipes. For day-to-day cooking, I keep coming back to the mini version because it’s faster to cook evenly and easier to batch without turning the kitchen into a project—similar to how I keep practical guidelines bookmarked from plans like this 14-day food list and recipe guide when I’m trying to keep decisions simple, and how I save quick treat options like these cookies you can enjoy guilt-free for when I want something snacky without extra fuss.
Mini Blooming Onions
Ingredients
Method
- Pour the buttermilk (or milk mixed with lemon juice) into a medium bowl—wide enough to dip and turn onion pieces easily.
- In a separate bowl, combine the flour, paprika, garlic powder, onion powder, cayenne, salt, and pepper. Stir well to evenly distribute the spices.
- Peel the sweet onions and cut them into smaller bloom-style portions (mini size).
- Dip the onion portions into the buttermilk, turning to coat. Let excess drip off.
- Press the damp onion pieces into the flour mixture, turning and gently pressing to coat the edges. Tapping on a little more flour if necessary.
- Lightly coat the outside with cooking spray or a small amount of oil.
- Place the coated mini blooming onions in the air fryer basket with a little space between pieces.
- Air fry until the coating looks set and dry, with deeper color on the ridges and tender onion inside. This should take about 15 minutes.
- Serve immediately for best crunchiness. If making multiple batches, keep the first batch loosely arranged while the next cooks.