
The Practical Why Behind It
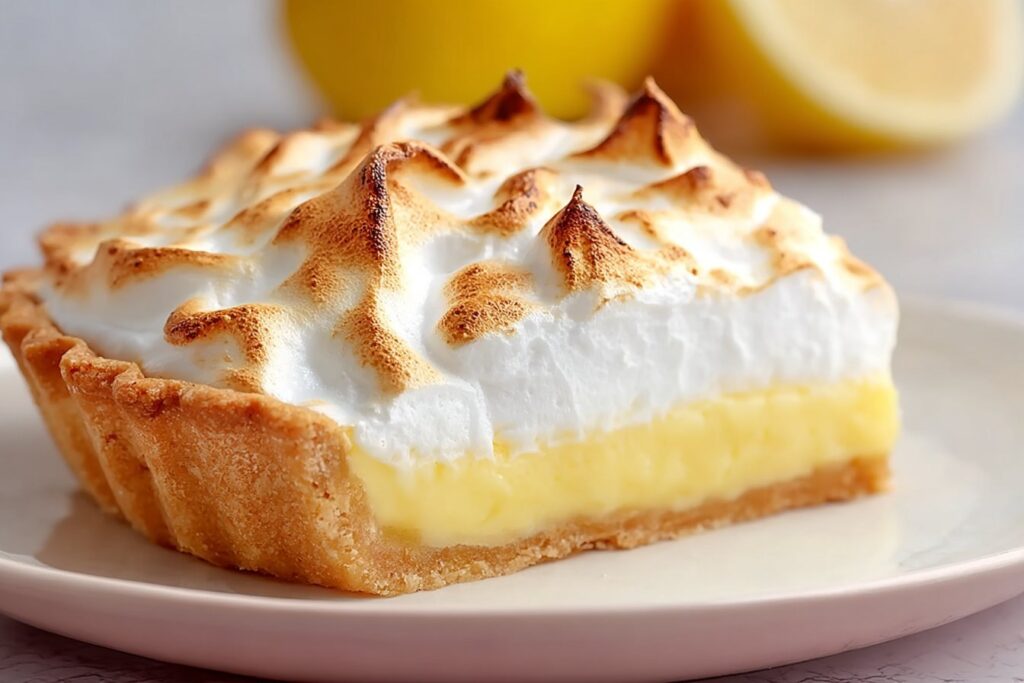
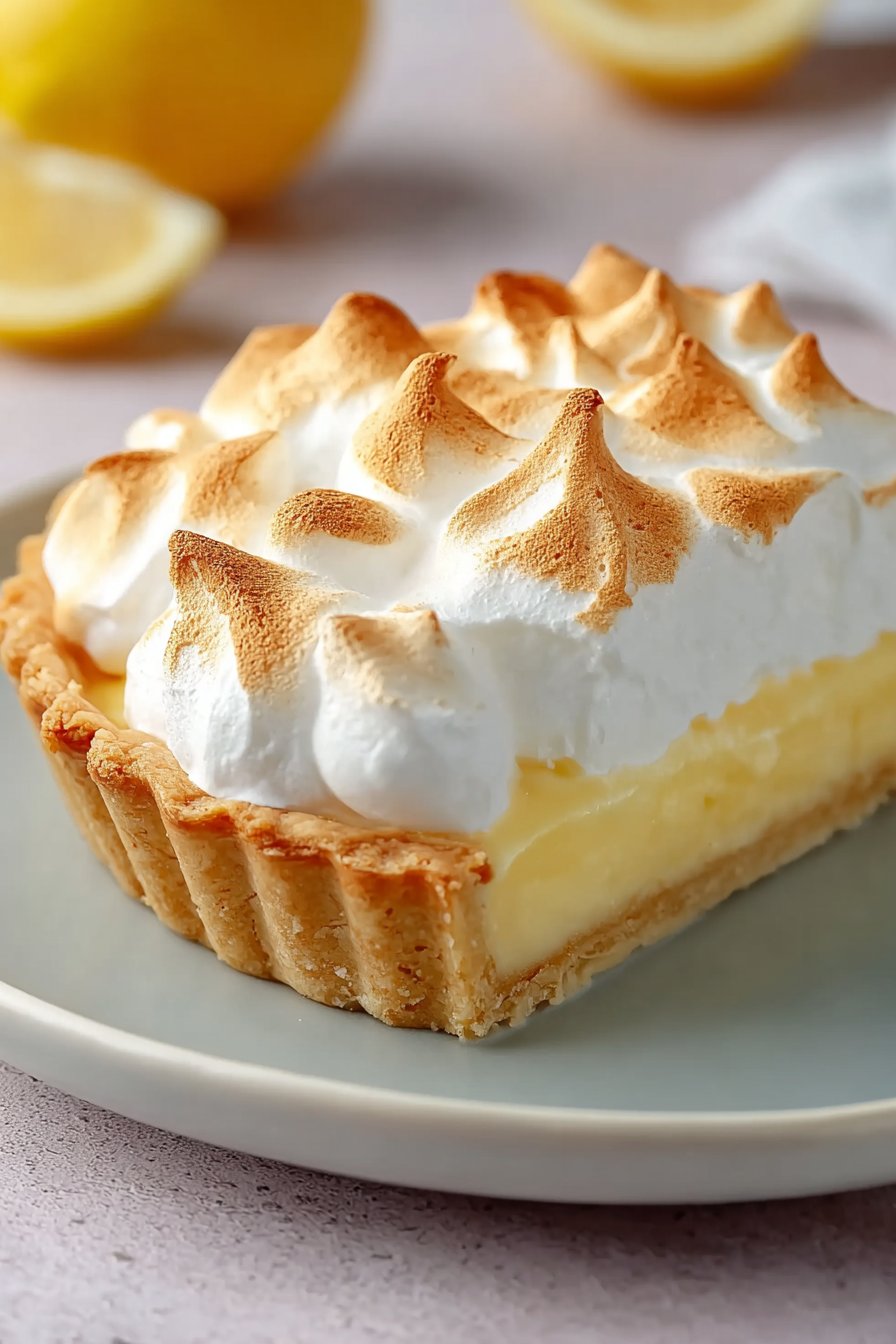
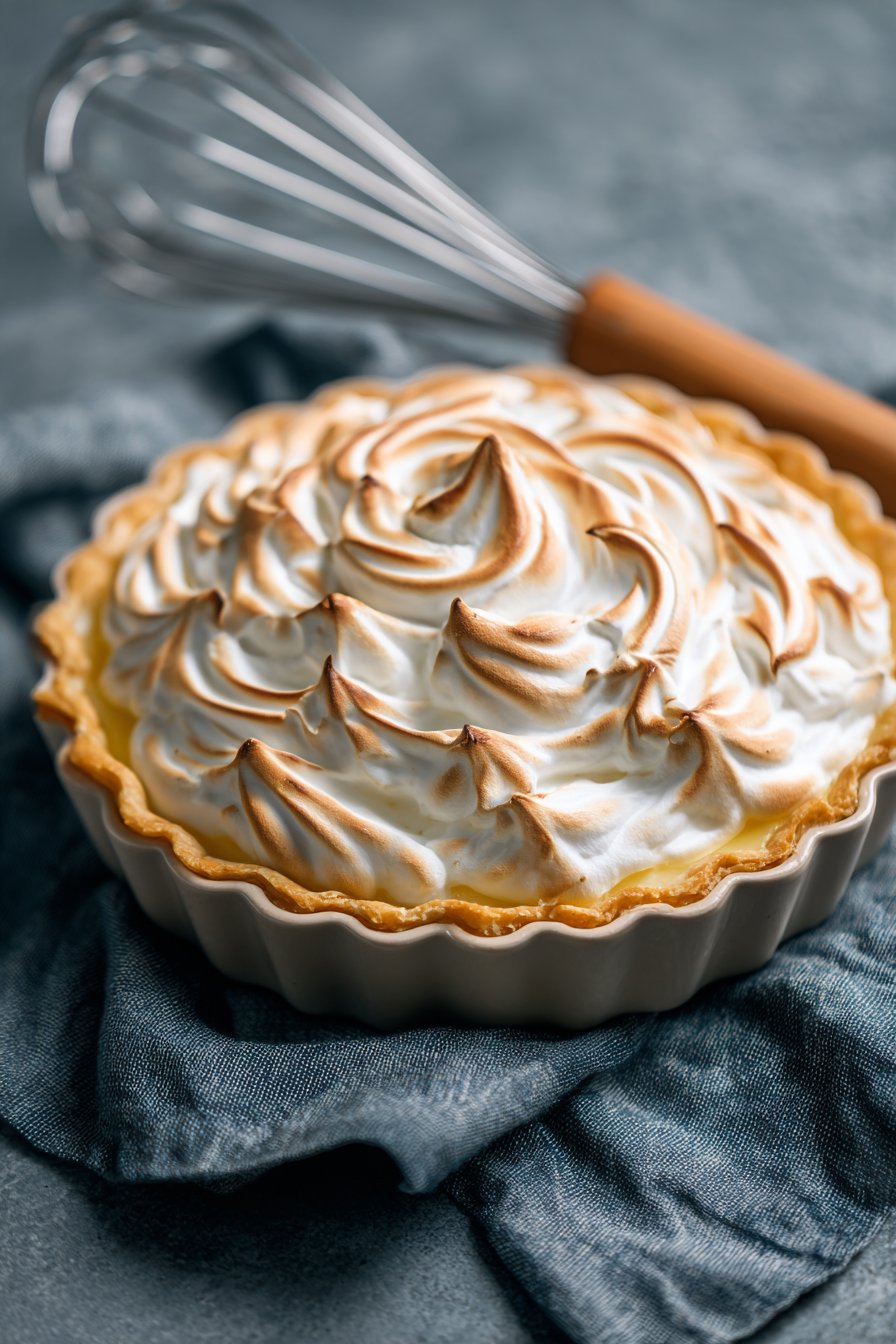
This Creamy Sugar Free Lemon Meringue Pie gives you a true bakery-style dessert—golden crust, silky lemon center, and soft, cloudlike meringue—without the sugar crash or complicated steps. You still get clean slices, a rich custard texture, and bright lemon flavor, but with ingredients that fit a lower-sugar or low-carb way of eating.
I build the crust with almond flour, a touch of granulated sweetener, and butter, so it bakes up tender with lightly crisp edges and a subtle nuttiness that supports the lemon instead of overpowering it. The filling leans on eggs, egg yolks, and heavy cream for structure and creaminess, not on sugar or starch. That gives you a smooth, velvety custard that sets well and never feels chalky or grainy.
From a technique standpoint, everything happens in calm, manageable stages. You mix the filling off the heat, then cook it slowly so the eggs thicken gently. There is no hot sugar syrup to whisk into egg whites and no tricky tempering. The meringue uses the egg whites you already separated for the filling, so nothing goes to waste and the ingredient list stays focused.
I also designed this pie to behave well in a real home kitchen. The filling holds up in the fridge without turning watery, the crust stays pleasantly firm under the custard, and the meringue browns in the oven in just a few minutes. You can comfortably make parts of it ahead, assemble, and chill, then bring out a dessert that looks like it came from a pastry case—only with a smarter ingredient profile.
Step-by-Step Method for a Silky, Stable Pie
Start with the crust so it has time to cool before you add the filling. Gently melt the butter, then stir in the almond flour and 1 tablespoon of granulated sweetener until the mixture looks like damp sand and holds together when you press it between your fingers. Beat in the egg until everything is fully combined. Press the mixture firmly and evenly into the base and up the sides of a small pie dish or tart pan, taking a moment to compact the corners so they don’t crumble later. Bake at 175°C (350°F) for 10–12 minutes, until the edges just start to turn golden. Set the crust aside to cool completely; if it’s even slightly warm when you add the filling, the base can soften and the pie may feel soggy underneath.
For the creamy lemon filling, add the heavy cream, 3 whole eggs, 3 egg yolks, 2 tablespoons granulated sweetener, lemon zest, and lemon juice to a medium saucepan before you turn on the heat. Whisk until the mixture looks smooth and evenly combined—this step helps guard against scrambled egg bits later. Place the pan over low to medium-low heat and cook, stirring constantly with a silicone spatula, making sure you sweep the bottom and corners of the pan. When the mixture thickens enough to coat the back of the spatula and a clear line stays when you run your finger through it, it’s ready. Remove the pan from the heat and keep stirring for another 30 seconds to cool it slightly and smooth out the texture. If the filling seems a little loose, let it sit for a minute; it will thicken further as it cools. Pour the lemon filling into the cooled crust, smooth the top, and let it stand while you prepare the meringue. This short rest helps keep a clean line between the lemon layer and the topping.
To make the meringue, start with a clean, dry mixing bowl and beaters—any grease will keep the egg whites from whipping properly. Add the 3 egg whites and the vanilla flavoring, then beat on medium speed until the whites look frothy and light. Increase the speed to high and whip to soft peaks. At this stage, if you prefer a sweeter, slightly firmer meringue, sprinkle in a little granulated sweetener at a time while you continue to beat. Whip until glossy stiff peaks form that stand straight up without drooping. Spoon the meringue over the warm lemon filling, spreading it gently to the pastry edges to seal the pie and help prevent weeping. Use the back of a spoon to create soft swirls over the top. Bake at 175°C (350°F) for about 10–12 minutes, until the meringue has light golden edges and a faintly toasted look. Cool the pie at room temperature until just barely warm, then chill for at least 2 hours so the lemon layer can fully set before you slice.
Make-Ahead and Storage Notes for Creamy Sugar Free Lemon Meringue Pie
This Creamy Sugar Free Lemon Meringue Pie handles advance prep better than most traditional versions, as long as you build it in stages. You can bake the almond flour crust up to 2 days ahead. Let it cool completely, then wrap it tightly and keep it at room temperature. The lemon custard filling can be cooked, cooled, and stored in an airtight container in the refrigerator for 2–3 days. When you’re ready to assemble, whisk the chilled filling briefly to loosen it, then spread it into the crust.
I don’t recommend adding the meringue more than a few hours before you plan to serve. Even a sugar free meringue can start to weep if it sits too long. For a low-stress plan, assemble the baked crust and cooked filling earlier in the day, keep them chilled, then whip the egg whites, top the pie, and bake the meringue layer the same day you’ll serve it.
Once the pie is fully assembled and baked, it tastes best within 24 hours, but you can store leftovers in the refrigerator for up to 2 days. Cover the pie loosely with inverted foil or a large bowl instead of plastic wrap, which tends to stick to the meringue and tear it off. Expect a small amount of moisture to collect around the edges after the first day; dab it gently with a paper towel before serving. Avoid freezing this pie. Both the creamy lemon filling and the whipped egg white topping can turn grainy and lose their smooth, airy texture once thawed. If you want a freezer-friendly lemon dessert for another time, you can use the same almond flour base and lemon mixture in a bar format without meringue.
Variations and How to Serve It
You can adjust this Creamy Sugar Free Lemon Meringue Pie to suit your taste without losing that classic bakery look. For a brighter, more pronounced citrus flavor, increase the lemon juice by ½–1 tablespoon and add a small pinch of salt to sharpen the edges. If you prefer a richer, slightly denser custard, swap half of the heavy cream for full-fat cream cheese and whisk until completely smooth before you add the eggs. For a nut-free crust, use finely ground sunflower seed flour or another seed blend in place of almond flour, and extend the baking time by a few minutes so the base stays crisp.
You can also play with the flavor of the meringue. Substitute ¼ teaspoon almond extract for the vanilla if you like a more fragrant finish; it gives the pie a subtle pastry-shop note. Just keep the amount modest so it doesn’t overpower the lemon.
For clean slices, chill the pie until the filling is fully set and the bottom of the pan feels cold, at least 3 hours. Use a sharp, thin knife dipped in hot water and wiped dry between cuts so you glide through the meringue and custard without dragging. Because this dessert is rich, slim wedges or bar-style slices work well and still feel satisfying. To garnish, keep it light: a few fresh berries or a sprinkle of lemon zest curls add color and brightness without adding much sugar. If you’re entertaining, you can bake the crust and cook the lemon filling a day ahead, then whip and bake the meringue layer just before guests arrive so it holds that glossy, lifted look.
Serving of Creamy Sugar Free Lemon Meringue Pie
Conclusion
This pie brings together a buttery almond crust, a smooth lemon custard, and a soft, golden-tipped meringue in a way that feels special but still practical for a home kitchen. You get the look and flavor of a classic bakery dessert, with a sugar free approach that supports your everyday eating goals.
If you’ve avoided lemon meringue pie because it seemed fussy, this method walks you through each step in a straightforward way. Take your time with the filling, whip the whites in a clean bowl, and let the pie chill fully before slicing. The result is a Creamy Sugar Free Lemon Meringue Pie you can rely on for weeknight dinners, holidays, and any time you want a bright, satisfying finish to the meal.
Instructions Process of Creamy Sugar Free Lemon Meringue Pie
Is this Creamy Sugar Free Lemon Meringue Pie keto and diabetic friendly?
This pie fits comfortably into many keto-style eating plans because it uses almond flour, heavy cream, and a sugar substitute instead of regular sugar. It also tends to work for people who need to manage blood sugar, since it avoids added sugar and leans on lower-carb ingredients. Exact carb counts will depend on the specific sweetener you choose, so check labels and calculate macros if you track them closely. If you have diabetes or follow a medically supervised diet, confirm the numbers with your own calculator and talk with your healthcare provider.
Which sweetener works best in this sugar free lemon meringue pie?
Choose a granulated, heat-stable sweetener that measures cup-for-cup like sugar. Erythritol, allulose blends, or monk fruit with erythritol usually perform well in both the crust and the cooked lemon filling without turning bitter. Avoid using only liquid stevia in the filling; it can taste sharp and doesn’t add the same structure. If your sweetener is sweeter than sugar, reduce the amount slightly and taste the mixture before baking.
Can I make this Creamy Sugar Free Lemon Meringue Pie ahead of time?
You can bake the crust and cook the lemon filling up to a day or two in advance, then keep them chilled separately. For the best texture and to reduce weeping, make and brown the meringue topping on the day you plan to serve the pie. If you do need to assemble the whole pie ahead, cover it loosely and refrigerate it, then expect a little extra moisture around the meringue. If the top looks slightly soft after chilling, you can briefly refresh the color under a low broiler, watching very closely so it doesn’t burn.
Recipe

Creamy Sugar Free Lemon Meringue Pie
Ingredients
Method
- Preheat the oven to 350°F and lightly grease an 8-inch pie dish or tart pan.
- In a mixing bowl, combine the melted butter, almond flour, and 1 tablespoon granulated sweetener for the crust and stir until the mixture resembles damp sand.
- Add the 1 medium egg for the crust and mix until a thick, cohesive dough forms.
- Press the crust mixture firmly and evenly into the bottom and up the sides of the prepared pie dish, compacting the corners so they do not crumble.
- Bake the crust for 10 to 12 minutes, until the edges are just turning golden, then remove and let cool completely on a rack.
- In a medium saucepan off the heat, whisk together the heavy cream, 3 eggs for the filling, 3 egg yolks, 2 tablespoons granulated sweetener, lemon zest, and lemon juice until smooth and well combined.
- Place the saucepan over low to medium-low heat and cook, stirring constantly with a silicone spatula, scraping the bottom and sides, until the mixture thickens enough to coat the back of the spatula and a line drawn with your finger stays clear.
- Remove the pan from the heat and continue stirring for 30 seconds to cool slightly and smooth the custard.
- Pour the warm lemon filling into the fully cooled crust and smooth the surface with a spatula, then let it stand at room temperature while you prepare the meringue.
- Reduce the oven temperature, if needed, to ensure it is at 350°F.
- In a clean, dry mixing bowl, add the 3 egg whites for the meringue and a pinch of salt, then beat with an electric mixer on medium speed until frothy.
- Add the vanilla flavoring and continue beating on high speed until soft peaks form.
- If using, sprinkle in 1 tablespoon granulated sweetener for the meringue, a little at a time, while beating, until stiff, glossy peaks form that stand straight up without drooping.
- Spoon the meringue over the warm lemon filling, spreading it to the edges of the crust to seal the pie and prevent gaps, then use the back of the spoon to create swirls on top.
- Bake the pie for 10 to 12 minutes at 350°F, until the meringue is lightly golden on the tips and edges.
- Remove the pie from the oven and cool at room temperature until just barely warm, then refrigerate for at least 2 hours before slicing and serving.
Notes
- Do not skip fully cooling the crust before adding the filling; a warm crust can soften and turn soggy under the custard.
- Stir the custard continuously over gentle heat to avoid curdling; if it looks slightly loose, it will firm as it cools.
- For cleaner slices, chill the pie at least 2 hours and wipe the knife between cuts.


