
Coffee-and-cocoa desserts are the ones I reach for when I need something that feels finished and intentional without a long ingredient list. These chocolate tiramisu cupcakes hit that lane: a dark, espresso-scented cupcake with a creamy mascarpone layer that gives you the tiramisu vibe in a format that’s easy to portion and share.
They’re also practical. The batter is straightforward, the flavor is bold without being fussy, and you’re not dealing with layers of ladyfingers or a big pan to slice cleanly. If you already keep espresso or instant coffee around, this is a good “make tonight, enjoy tomorrow” bake—similar in spirit to a treat like my chocolate brownie waffle when you want chocolate payoff without a complicated setup.
Why This Recipe Works
- Espresso amplifies the cocoa: using a full cup of espresso deepens the chocolate flavor instead of just making the cupcakes taste like coffee.
- Oil keeps the crumb tender: vegetable oil gives you a moist, soft cupcake that stays pleasant even after chilling (which matters with mascarpone).
- Baking powder gives reliable lift: with cocoa-heavy batters, freshness matters—this one leans on baking powder for a consistent rise.
- Mascarpone adds tiramisu-style richness: it’s creamy and mild, so it rounds out the espresso without making the dessert heavy in an oily way.
- Straightforward pantry list: flour, cocoa, sugar, eggs, milk—nothing unusual, and the swaps listed still keep the structure intact.
- Portionable and low-mess to serve: cupcakes mean no slicing, no crumbling corners—just chill, dust with cocoa, and serve.
Quick Kitchen Note
I like cupcake versions of classic desserts because they’re easier to store, easier to portion, and less stressful to transport—especially when the topping is something soft like mascarpone (a little like how I rely on bakery-style almond flour cupcakes when I want a predictable bake).
What It Tastes Like
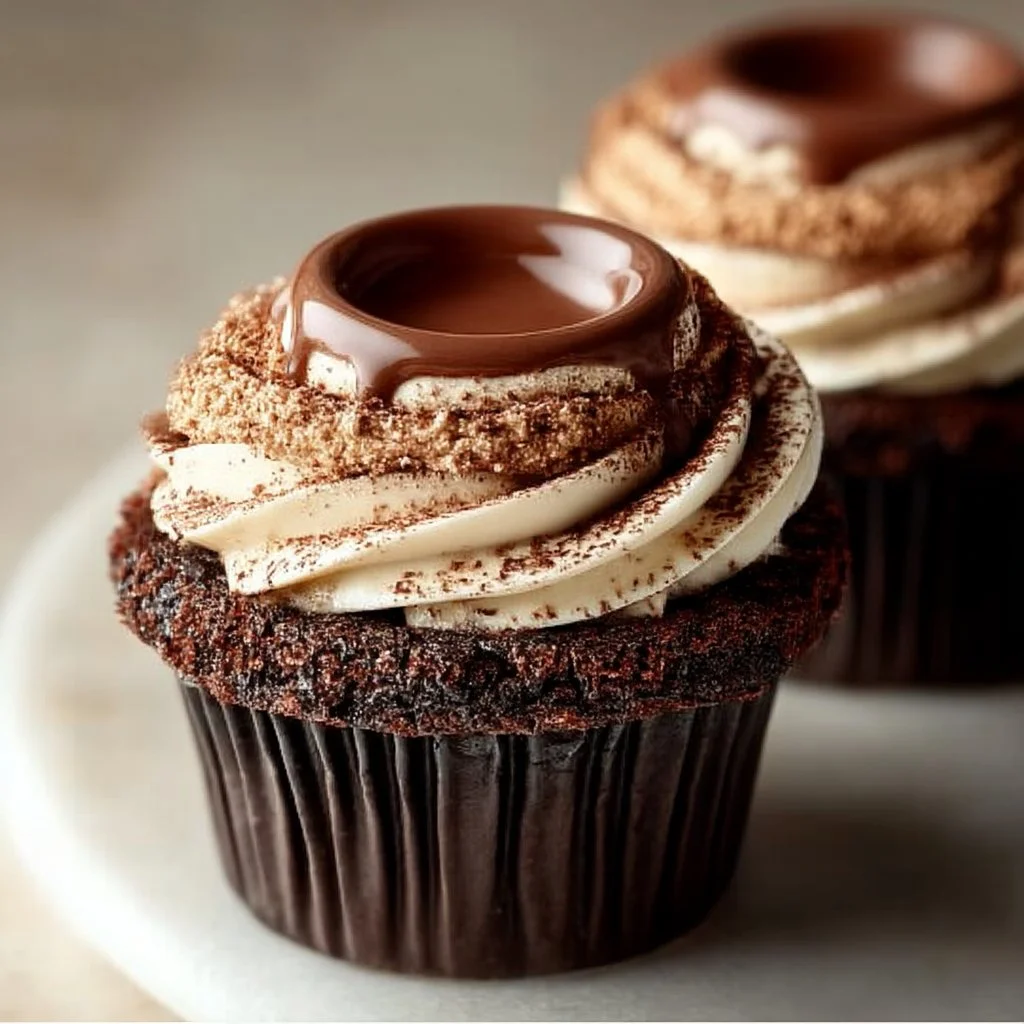
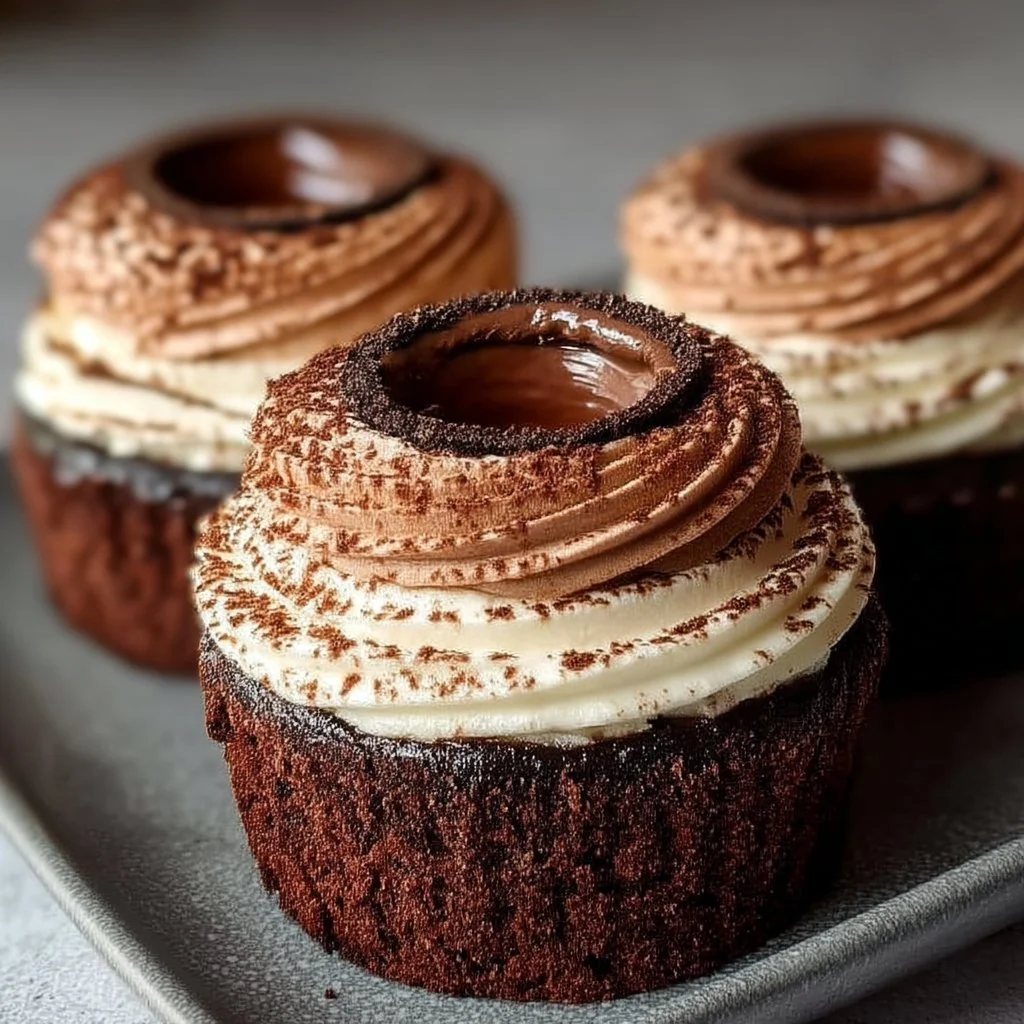
These taste like dark chocolate with a clear espresso aroma—think cocoa-forward first, then a coffee finish that lingers. The cupcakes are tender and moist rather than fluffy-dry, and the mascarpone brings a cool, lightly sweet creaminess that balances the bitterness of cocoa. The final dusting of cocoa gives that classic tiramisu impression and keeps the sweetness from feeling sharp.
Ingredients
This recipe leans on cocoa + espresso for depth and a true “tiramisu-adjacent” flavor, while mascarpone brings the creamy contrast. If you need to adapt, a gluten-free all-purpose blend generally works in place of flour, almond milk works in place of dairy milk, and ricotta can stand in for mascarpone (it’ll be slightly less silky). For another chocolate option that’s naturally portioned and quick, my 3-minute chocolate fudge is a good back-pocket recipe.
- 1 cup All-Purpose Flour (Substitute with gluten-free all-purpose blend)
- 1/2 cup Cocoa Powder (Dark cocoa for deeper taste)
- 1 tbsp Baking Powder (Check for freshness)
- 3/4 cup Granulated Sugar (Coconut sugar as alternative)
- 2 large Eggs (Flax eggs for plant-based)
- 1/2 cup Milk (Almond milk for dairy-free)
- 1/3 cup Vegetable Oil (Melted butter as alternative)
- 1 cup Espresso (Use instant coffee if preferred)
- 1 cup Mascarpone Cheese (Ricotta as alternative)
- 2 tbsp Cocoa Powder
Step-by-Step Instructions
-
Prep your dry ingredients. In a mixing bowl, whisk together the flour, 1/2 cup cocoa powder, baking powder, and granulated sugar until the cocoa looks evenly distributed (no obvious brown streaks). This quick whisk helps prevent pockets of baking powder or cocoa.
-
Mix the wet ingredients. In a second bowl, whisk the eggs until smooth, then whisk in the milk and vegetable oil until the mixture looks unified and slightly glossy.
-
Add espresso for that tiramisu note. Pour the espresso into the wet mixture and whisk again. The batter base will look thin—this is expected because espresso is doing a lot of flavor work here.
-
Combine wet and dry—gently. Pour the wet mixture into the dry ingredients. Stir just until you no longer see dry flour. The batter should look smooth and loose, like a pourable cake batter. Stop mixing once it’s combined; overmixing can make cocoa-based cakes bake up tougher.
-
Portion into a cupcake pan. Divide the batter evenly into your cupcake wells. Aim for consistent fill so they bake evenly. (If you’re using liners, this also makes cleanup easier.)
-
Bake until set. Bake until the tops look set and the cupcakes spring back lightly when touched. You should not see wet batter on the surface. Let them cool fully before adding mascarpone—warm cupcakes can soften the cheese and make it slide.
-
Finish with mascarpone. Once completely cool, top each cupcake with mascarpone. You’re looking for a creamy layer that sits on top without melting into the cake.
-
Dust with cocoa right before serving. Use the remaining 2 tbsp cocoa powder to dust the tops. Keep it light and even for that tiramisu look and a slightly bittersweet finish.
Common Mistakes to Avoid
- Using flat baking powder: it matters here because cocoa-heavy batters need reliable lift. Fix: check freshness; if it’s old, replace before baking.
- Overmixing after combining wet + dry: this can make the cupcakes bake up dense. Fix: mix only until no dry flour remains.
- Topping while cupcakes are warm: mascarpone can loosen and slide. Fix: cool completely before adding the cheese.
- Going heavy-handed with the cocoa dusting: too much can taste chalky and overpower the mascarpone. Fix: dust lightly and evenly.
- Swapping mascarpone without adjusting expectations: ricotta works, but it’s less silky and can read slightly grainy. Fix: use it as a practical substitute, not a 1:1 texture match.
Variations and Swaps
- Gluten-free: use a gluten-free all-purpose blend in place of the flour. Expect a slightly more delicate crumb; handle gently once cooled.
- Dairy-free milk: almond milk works well in place of milk; the cupcakes still bake up moist due to the oil and espresso.
- Butter instead of oil: melted butter can replace the vegetable oil; it will shift the flavor slightly toward a more classic cake richness.
- Instant coffee instead of espresso: dissolve instant coffee to make a strong 1 cup coffee and use it in the same spot—keep it bold so the chocolate still tastes “tiramisu-style.”
- Ricotta instead of mascarpone: workable and accessible; the topping won’t be quite as plush, but still creamy and mild.
Serving Suggestions
- Serve slightly chilled or at cool room temperature so the mascarpone holds its shape.
- If you’re planning dessert after a savory dinner, these are a clean finish after something creamy and herby like creamy Tuscan chicken—the espresso/cocoa combo feels especially satisfying afterward.
- For a smaller sweet bite, you can cut a cupcake in half and serve it plated, cocoa-side up, so the mascarpone layer stays neat.
Storage and Meal Prep
- Refrigerate for best results: because of the mascarpone topping, store these in the fridge in a covered container.
- Add cocoa dusting later: if you’re making them ahead, top with mascarpone and refrigerate, but dust with cocoa close to serving for the cleanest look and flavor.
- Bring to serving temp briefly: if they feel too firm straight from the fridge, let them sit out briefly so the cupcake texture softens and the espresso aroma comes through more clearly.
- Make-ahead strategy: bake the cupcakes, cool completely, and refrigerate. Add mascarpone and cocoa when you’re ready to serve for the tidiest finish.
FAQs
Can I make these ahead of time?
Yes. Bake and cool the cupcakes, then refrigerate. Add mascarpone and the cocoa dusting closer to serving for the cleanest top.
Do they taste strongly like coffee?
They’re chocolate-forward, with a noticeable espresso aroma and a coffee finish. If you prefer it milder, use a less intense coffee, but keep the full cup so the batter’s moisture stays consistent.
Can I use ricotta instead of mascarpone?
Yes. The flavor works, but the topping will be less silky. Keep the cupcakes fully cool before topping so it holds better.
Why did my cupcakes turn out dense?
Most often it’s overmixing after combining wet and dry, or baking powder that isn’t fresh. Mix just until combined and check your baking powder.
Final Tip
Treat the mascarpone like a “cool finish,” not a frosting you can rush—cool the cupcakes completely, then top. That one step keeps the creamy layer distinct, which is what makes these read as tiramisu rather than just chocolate cupcakes with cheese on top.
Conclusion
If you want to explore more cupcake formats and flavor directions, I keep a short list of references I genuinely find useful—starting with cupcake recipe collections for classic bases and variations, a focused take on tiramisu cupcakes with mascarpone frosting to compare approaches, and these German chocolate cupcakes when you’re in the mood for a different kind of rich chocolate profile.

Chocolate Tiramisu Cupcakes
Ingredients
Method
- In a mixing bowl, whisk together the flour, 1/2 cup cocoa powder, baking powder, and granulated sugar until the cocoa looks evenly distributed.
- In a second bowl, whisk the eggs until smooth and then whisk in the milk and vegetable oil.
- Pour the espresso into the wet mixture and whisk again until combined.
- Pour the wet mixture into the dry ingredients and stir just until no dry flour is visible.
- Divide the batter evenly into a cupcake pan, filling each well consistently.
- Bake for about 20 minutes or until the tops look set and spring back lightly when touched.
- Let the cupcakes cool completely before adding the mascarpone.
- Once cooled, top each cupcake with a layer of mascarpone.
- Dust the tops lightly with the remaining cocoa powder right before serving.


