

Why This Keto Cheesecake Works
This Oven Baked Keto Cheesecake (Sugar Free & Low Carb) uses a classic New York style method, so the texture stays rich and creamy instead of chalky or grainy, which can happen with low carb desserts. Beating the cream cheese and powdered sweetener at low to medium speed keeps the batter smooth and minimizes air bubbles, so you get clean slices with no big cracks. Baking the almond flour crust briefly on its own gives it a head start, so it turns lightly golden and holds up under the filling instead of going soggy. I also keep the ingredient list tight and familiar for a Keto friendly dessert you can shop for in one quick trip.
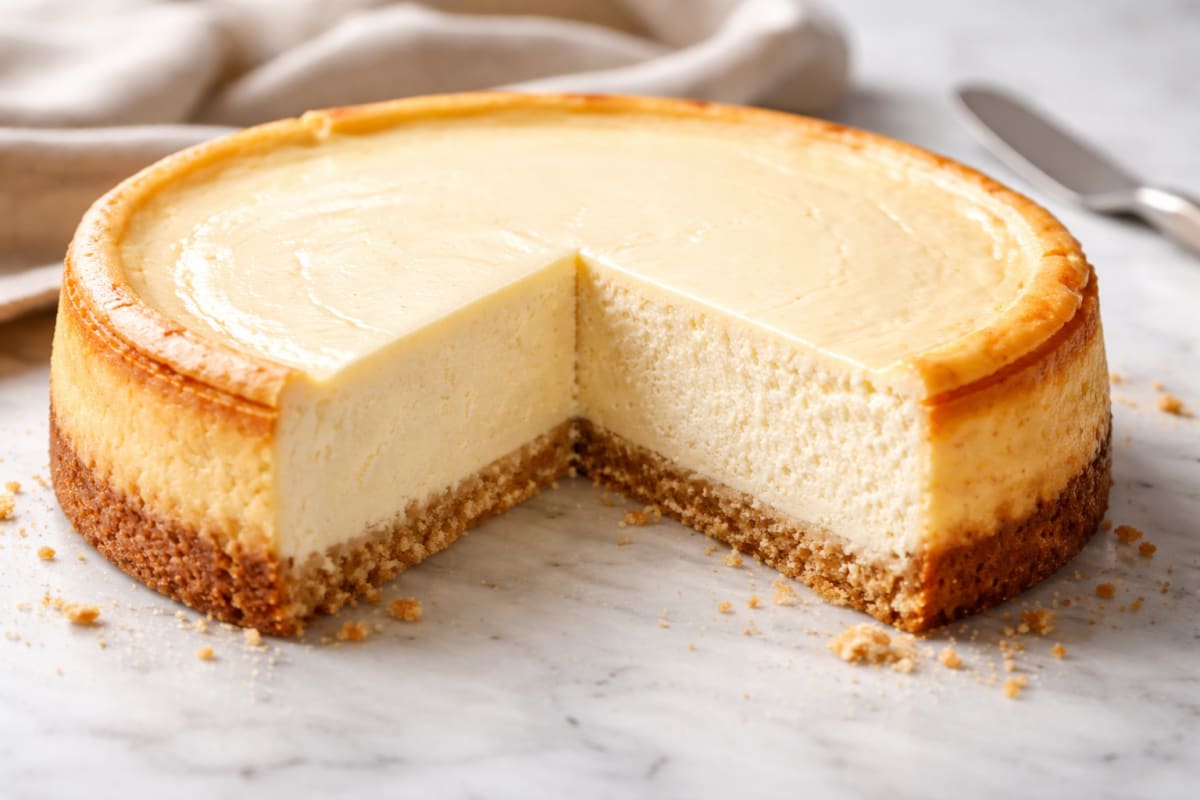
This Keto Cheesecake (Sugar Free & Low Carb) stays close in taste to traditional cheesecake because it uses full fat cream cheese, real butter, and vanilla, so you keep all the flavor while cutting the sugar. Monk fruit allulose blends brown and dissolve more like sugar than many other sweeteners, so the crust toasts properly and the filling tastes smooth, not cooling or gritty. Lemon juice adds a subtle brightness that balances the richness, which means you can enjoy a full sized slice without it feeling heavy. Keeping the bake time moderate and pulling the cheesecake while the center is still slightly jiggly prevents overbaking, so it sets as it cools and keeps that tender center every good cheesecake should have.

Ingredients Image of Keto Cheesecake (Sugar Free & Low Carb)
How to Make It
To make this Keto Cheesecake (Sugar Free & Low Carb), start with the crust so it has time to cool. Preheat your oven to 350 degrees F and line a 9 inch springform pan with parchment on the bottom so the crust releases cleanly. Stir the almond flour, melted butter, sweetener, and vanilla bean paste together until the mixture feels like slightly damp, crumbly sand that holds when you press it. Press it firmly into an even layer in the pan, really packing it down so it bakes into a sturdy base that will not fall apart when you slice. Bake the crust until it is just turning light golden around the edges, then let it cool for at least 10 minutes while you mix the filling so the heat does not melt the cream cheese layer.

Process Image of Keto Cheesecake (Sugar Free & Low Carb)
For the filling, use cream cheese that feels soft and slightly cool to the touch so it blends smoothly without lumps. Beat the cream cheese and powdered sweetener on low to medium speed until the mixture looks fluffy and there are no visible grains of sweetener. Add the eggs one at a time, mixing on low and scraping the bowl between each so you do not beat in too much air, which can cause cracks in a baked Keto Cheesecake (Sugar Free & Low Carb). Finish with the lemon juice and vanilla bean paste, keeping the speed low and stopping as soon as everything looks silky and uniform. Pour the batter over the cooled crust, smooth the top with a spatula, and tap the pan firmly on the counter several times to knock out any air pockets. Bake until the outer edges look set and the center has a gentle jiggle when you nudge the pan, similar to agar-agar powder; it will firm up as it cools, just like with my other low carb dessert recipes.
Time, Prep, and Storage Plan
You can plan this Keto Cheesecake (Sugar Free & Low Carb) as either a same day dessert or a make ahead treat. Hands on prep takes about 10 minutes, with 10 to 12 minutes for the almond flour crust and 40 to 55 minutes for baking the filling. After baking, let the cheesecake cool at room temperature until it is barely warm, then chill it for at least 4 hours, but overnight gives the cleanest slices and best texture. If you need it for an evening dinner, bake it in the morning and chill all afternoon. For a holiday or party, I like to bake a full Keto Cheesecake (Sugar Free & Low Carb) the day before so it is completely set and stress free.
Store leftovers covered in the fridge for up to 5 days. Wrap the pan in plastic wrap, or transfer individual slices to an airtight container so the cheesecake does not pick up fridge odors. For longer storage, freeze the Keto Cheesecake (Sugar Free & Low Carb) in slices on a baking sheet until solid, then wrap each slice tightly and freeze for up to 2 months. Thaw slices overnight in the fridge, or at room temperature for about 30 to 45 minutes until the center feels cool but not icy. The texture stays creamy, especially because this recipe does not use added starches that can turn grainy after freezing.
Flexible Options and Serving Notes

Serving Image of Keto Cheesecake (Sugar Free & Low Carb)
This Oven Baked Keto Cheesecake (Sugar Free & Low Carb) adapts easily to what you have in your kitchen and how strict you need to be with carbs. For the crust, you can swap almond flour for a fine ground pecan or walnut meal, which gives a slightly deeper, nutty flavor and can help if you avoid almonds. If you are nut free, you can bake the creamy filling on its own in a greased springform pan for a crustless version, then chill it fully before slicing so it holds clean edges. The Besti monk fruit allulose blend keeps the texture very close to classic cheesecake, but another powdered keto sweetener will work if needed, as long as you adjust to taste and know it may turn out a bit firmer or more crumbly. For the filling, you can boost the citrus notes with extra lemon zest, or keep it neutral if you plan to top it with a strong flavored sauce, like a keto berry compote or sugar free chocolate drizzle.
For serving, this Keto Cheesecake (Sugar Free & Low Carb) tastes best after at least 6 hours in the fridge, or overnight for the most even texture. I like to cut it into 16 slim slices, which keeps each serving at 5 grams net carbs, and then add low carb toppings at the table so everyone can customize. Great choices include a spoonful of fresh berries, a few toasted nuts, a swipe of sugar free blueberry sauce, or a light dusting of powdered keto sweetener for a classic look. If you want to round out a dessert spread, pair this cheesecake with something simple and contrasting, like a fresh citrus salad or a tray of keto dark chocolate squares. Leftovers keep very well; store slices covered in the fridge for up to 5 days, or freeze them individually, then thaw in the fridge so the texture stays smooth and creamy instead of icy.
Conclusion
I love how a simple homemade dessert can quietly turn an ordinary day into something a little more special. This Keto Cheesecake (Sugar Free & Low Carb) does exactly that. It lets you sit down with the people you care about, share a beautiful slice, and enjoy something creamy and satisfying without feeling like you have to “start over” tomorrow. Whether you make it for a small celebration or just a weeknight treat, it has a way of bringing everyone to the table.
If you have been hesitating to bake cheesecake at home, this is your sign to go for it. The steps are straightforward, the ingredients are familiar, and you get plenty of room to make it your own with toppings and flavors. Give it a try, pay attention to the visual cues, and trust that it will come together. You might be surprised how quickly this becomes your go to dessert.
For more delicious recipes like this, follow us on Facebook and Pinterest!
Recipe
Keto Cheesecake (Sugar Free & Low Carb)
Ingredients
Method
- Preheat the oven to 350°F. Line the bottom of a 9-inch springform pan with parchment paper.
- In a medium bowl, stir together the almond flour, melted butter, 2 tbsp granular or powdered sweetener, and 1/2 tsp vanilla bean paste until well combined and slightly crumbly.
- Press the crust mixture firmly and evenly into the bottom of the prepared pan. Bake for 10 to 12 minutes, until the edges are just barely golden. Remove from the oven and let the crust cool for at least 10 minutes.
- While the crust cools, place the softened cream cheese and powdered sweetener in a large mixing bowl. Beat on low to medium speed until smooth and fluffy, scraping down the sides of the bowl as needed.
- Add the eggs one at a time, beating on low speed after each addition just until incorporated. Do not overmix.
- Add the lemon juice and remaining 1/2 tsp vanilla bean paste. Beat on low speed just until the mixture is smooth and uniform.
- Pour the cheesecake filling over the cooled crust in the springform pan. Smooth the top with a spatula, then tap the pan firmly on the counter several times to release air bubbles.
- Bake for 40 to 55 minutes, until the edges are set and the center is almost set but still slightly jiggly when you gently shake the pan.
- Turn off the oven, crack the oven door slightly, and let the cheesecake cool in the oven for 30 minutes. Then transfer the pan to a wire rack and cool to room temperature.
- Once cooled, cover the cheesecake and refrigerate for at least 4 hours, or until fully chilled and set, before slicing and serving.
Notes
- Keep the mixer speed at low to medium the entire time to minimize air bubbles and help prevent cracks in the cheesecake.
- For the cleanest slices, chill the cheesecake overnight before cutting and wipe your knife clean between cuts.
- Store leftover cheesecake covered in the refrigerator for up to 5 days, or freeze individual slices tightly wrapped for longer storage.


