

What Makes These Red Velvet Cookies So Reliable
I built this Red Velvet Cookies recipe to behave the same way every time, even with sugar substitutes and gluten free or low carb swaps. The dry mix starts with a clear base ratio of flour, baking powder, and cocoa, so the cookies hold their shape instead of spreading into puddles. Using both Splenda and Surkin Gold mimics the sweetness and slight caramel notes of regular sugar, which keeps the flavor balanced instead of flat or overly sweet. The butter-to-dry-ingredient ratio gives you tender centers with light chew, not crumbly “diet” cookies that fall apart on the tray. A full tablespoon of red food coloring ensures that classic deep red color shows up reliably, even with unsweetened cocoa in the mix.
The method is just as predictable as the ingredient list. Creaming the butter with the sugar alternatives in a separate bowl creates structure and helps the cookies bake up with those bakery-style tops, rather than dense disks. Mixing the dry ingredients thoroughly before adding them prevents pockets of cocoa or baking powder, so every cookie bakes evenly from edge to center. Baking at 325°F gives the dough enough time to set without drying out, which is especially important when you use low carb or gluten free flour alternatives. I also keep the total bake time tight and repeatable, so you can pull these Red Velvet Cookies when the edges are just set and know they’ll finish firming as they cool.
Because the base is straightforward, you can adjust this recipe to fit your pantry without risking surprises. You can swap in a measured low carb baking blend or gluten free flour and still keep the same mixing order and technique. The cocoa amount stays modest so the red color stays vibrant while still giving that subtle chocolate note you expect in Red Velvet Cookies. With a short ingredient list, clear mixing steps, and a forgiving bake temperature, this is the kind of cookie recipe you can put on repeat for holidays, cookie trays, or an everyday dessert that doesn’t blow your sugar budget.
The Method (Step-by-Step)
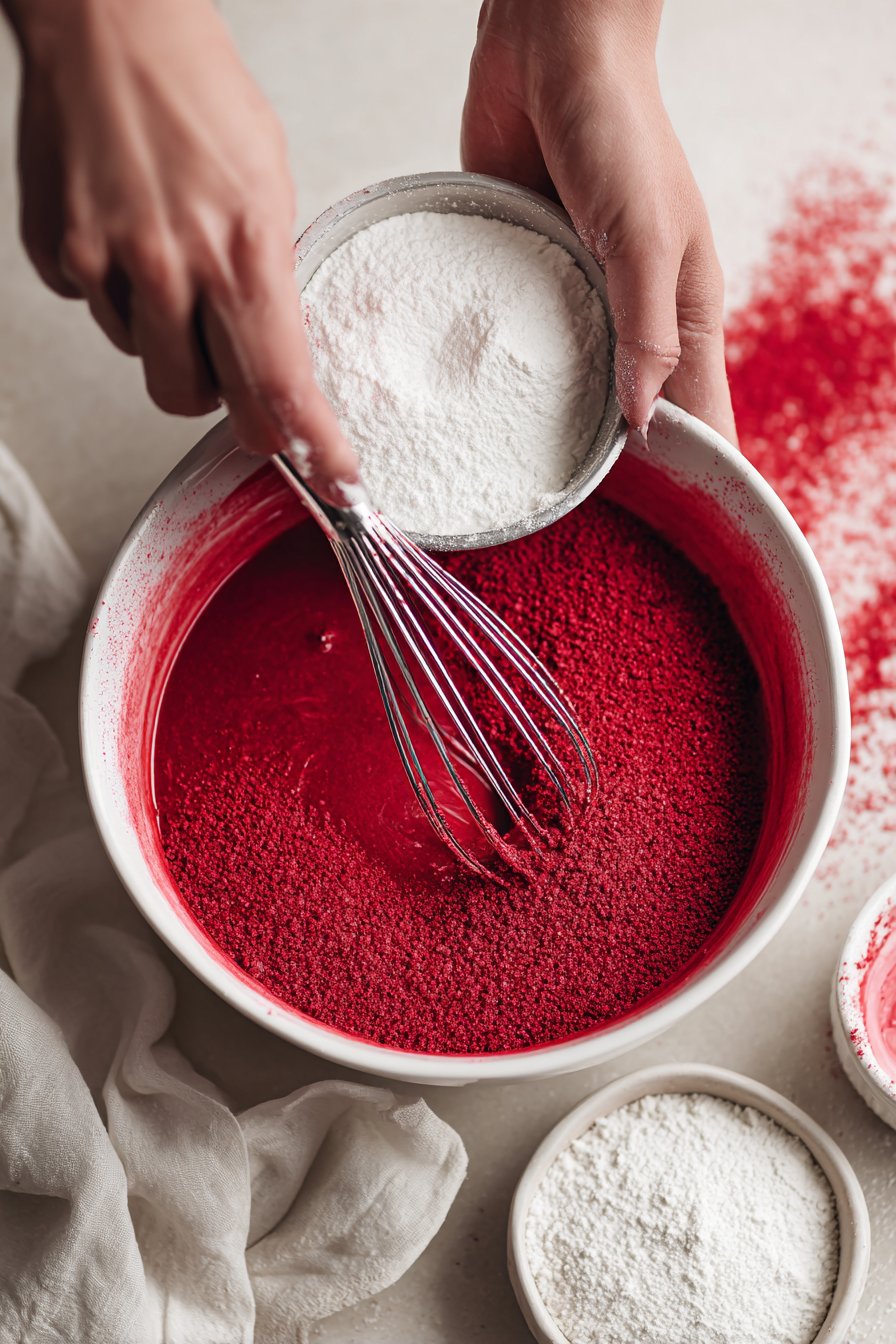
Start by preheating your oven to 325°F and lining your baking sheets with parchment or silicone mats so the Red Velvet Cookies release cleanly. In a medium bowl, whisk together the flour, baking powder, and cocoa powder until the color looks even and there are no visible streaks. This step matters with red velvet—any pockets of plain flour will show in the final color and create dry spots. In a separate large bowl, beat the softened butter with the Splenda and Surkin Gold until the mixture looks pale and fluffy; this can take 2–3 minutes with a hand mixer. Scrape down the sides of the bowl once or twice so every bit of sweetener incorporates, especially since sugar substitutes don’t melt into the fat quite like regular sugar.
Once the butter mixture is creamy, beat in the egg, vanilla bean paste, and red food coloring on low speed until fully blended and the color is uniform. If the red looks a little dull, you can add a small extra drop of coloring—but do it gradually so you don’t overdo it. Add the dry mixture in two additions, mixing on low or stirring with a spatula just until no dry flour remains; the dough should be soft but not sticky. If it feels too loose to scoop, let it sit for 2–3 minutes—low carb flours and cocoa often hydrate as they rest and firm up slightly. Scoop small mounds of dough (about 1 tablespoon each) onto the prepared sheets, spacing them a couple of centimeters apart, and bake for about 10 minutes per tray, or until the edges are set and the centers look slightly soft. Let the cookies cool on the pan for 5 minutes, then move them to a rack to finish setting—this is when the texture settles into that classic tender Red Velvet Cookies bite.
Keep It Fresh: Timing and Storage
Red Velvet Cookies taste best when the centers stay slightly soft and the edges just set, so timing matters. Once they come out of the oven, let them cool on the baking sheet for about 5 minutes to firm up, then move them to a wire rack to cool completely. If you try to store them while they’re still warm, condensation builds up in the container and turns those pretty cookies dry around the edges and slightly gummy in the middle. For the best texture, I recommend baking only what you need for the next 2–3 days and chilling or freezing the rest of the dough. This is especially helpful with lower-carb or sugar-free doughs, which can dry out faster once baked.
Once your Red Velvet Cookies are completely cool, store them in an airtight container at room temperature for up to 3 days. Separate layers with parchment to keep the cookies from sticking and to protect those vibrant tops. If your kitchen runs very warm or humid, you can refrigerate them for up to 1 week, but expect the texture to firm slightly; a brief rest at room temperature helps them soften again. To freeze baked cookies, arrange them in a single layer on a baking sheet, freeze until solid, then transfer to a freezer bag for up to 2 months. If you prefer truly fresh-baked flavor, freeze scooped cookie dough balls instead and bake them straight from the freezer, adding 1–2 extra minutes to the bake time.
Swaps, Variations, and Serving Ideas for Red Velvet Cookies
You can keep these Red Velvet Cookies sugar free and still adjust them to match how you actually bake at home. For the flour, you can use a gluten free baking blend (1:1 style) or a mix of almond flour and coconut flour if you bake low carb—just know almond flour spreads more, so chill the dough and give the cookies extra space on the sheet. If you prefer regular sugar, you can swap the Splenda and Surkin Gold for granulated sugar and light brown sugar, but the cookies will no longer be sugar free and may bake a touch faster. You can also trade the vanilla bean paste for regular vanilla bean paste, and use gel food coloring instead of liquid (start with half the amount and add more as needed for that classic deep red color).
Once you love the base Red Velvet Cookies, it’s easy to play with mix-ins and textures. Stir in sugar free white chocolate chips, chopped dark chocolate, or a handful of pecans for crunch—just keep total add-ins to about ½–¾ cup per batch so the dough still holds together. For a “cheesecake” feel, sandwich two cookies around a small dollop of lightly sweetened cream cheese, or pipe a swirl of cream cheese frosting on top once they cool. You can also bake them slightly smaller and serve a few alongside vanilla Greek yogurt or a scoop of low sugar ice cream for a simple dessert plate.
For serving, I like to lean into the color and contrast. Pair these Red Velvet Cookies with fresh strawberries or raspberries on a platter for an easy, bright-looking spread. They work well on holiday cookie trays next to classic chocolate chip cookies or peanut butter cookies, because the red color breaks up all the beige. If you’re packing them for gifting, underbake them by about 1 minute for a softer center—they stay tender longer and feel more “bakery-style” the next day.

Serving of Red Velvet Cookies
Conclusion
Baking a batch of these cookies is one of those small, everyday rituals that feels a little bit special. From the moment the tray goes into the oven to that first bite into a soft, slightly chewy center, you’re creating more than dessert—you’re creating a pause in a busy day, a reason to gather around the kitchen counter, and a memory that tends to linger a little longer than the crumbs. Whether you’re sharing them at a party, packing them into a lunchbox, or enjoying one quietly with coffee, they have a way of bringing people together.
I hope this recipe makes you feel confident, capable, and just a little excited to turn on your oven, even when life feels full. If you’ve been craving cozy, bakery-style treats at home, let this be your sign to make these Red Velvet Cookies and see how simple it can be. Bake a batch, share them with someone you love, and don’t be surprised when you’re asked for the recipe.
For more delicious recipes like this, follow us on social media!
Instructions Process of Red Velvet Cookies
Can I change the sweetener or flour in these Red Velvet Cookies?
You can swap in another granular, 1:1 sugar substitute if you prefer, but know that sweetness and spread may change slightly. Look for a sweetener specifically labeled for baking, not a concentrated drop or powder meant only for drinks. For a gluten-free option, use a cup-for-cup gluten-free baking blend, not a single flour like almond or coconut on its own. Gluten-free dough can be softer, so you may need to chill it for 20–30 minutes before scooping. If your dough feels dry, add 1–2 teaspoons of milk until it just comes together.
How do I get the right red velvet color and texture?
I use about 1 tablespoon of red food coloring to get that deep, classic red velvet look. You can reduce it slightly if you prefer a more muted color, but too little can leave your cookies looking brownish from the cocoa. For the best texture, cream the butter and sweeteners until very light and fluffy; this step gives you that bakery-style lift. Bake just until the edges set and the centers still look slightly soft—overbaking dries them out fast. If the cookies seem a bit puffy right out of the oven, let them cool on the sheet for a few minutes and they’ll settle.
Recipe

Red Velvet Cookies
Ingredients
Method
- Preheat the oven to 325°F and line two baking sheets with parchment paper or silicone baking mats.
- In a medium bowl, whisk together the flour, baking powder, and unsweetened cocoa powder until evenly combined and no streaks remain.
- In a large bowl, beat the softened butter, Splenda, and Surkin Gold with a hand mixer on medium speed for 2 to 3 minutes, until pale and creamy.
- Add the egg, vanilla bean paste, and red food coloring to the butter mixture and beat on low speed until fully combined and the color is uniform.
- Add the dry ingredients to the wet ingredients in two additions, mixing on low speed or with a spatula just until no dry spots of flour remain; the dough should be soft but not sticky.
- Let the dough rest for 2 to 3 minutes to allow the cocoa and flour to hydrate and firm slightly if it feels loose.
- Scoop the dough into 1-tablespoon portions and place on the prepared baking sheets, spacing each cookie about 2 inches apart.
- Bake one sheet at a time for 10 minutes, or until the edges are set and the centers look slightly soft but not wet.
- Remove from the oven and let the cookies cool on the baking sheet for 5 minutes to set.
- Transfer the cookies to a wire rack and cool completely before storing or serving.
Notes
- Do not overbake; the cookies will firm as they cool, and pulling them when the centers are just set keeps the texture soft and tender.
- Store completely cooled cookies in an airtight container at room temperature for up to 3 days, or freeze baked cookies for up to 2 months.
- If the color looks too pale after mixing, add red food coloring a few drops at a time, mixing between additions until you reach a deep red.


