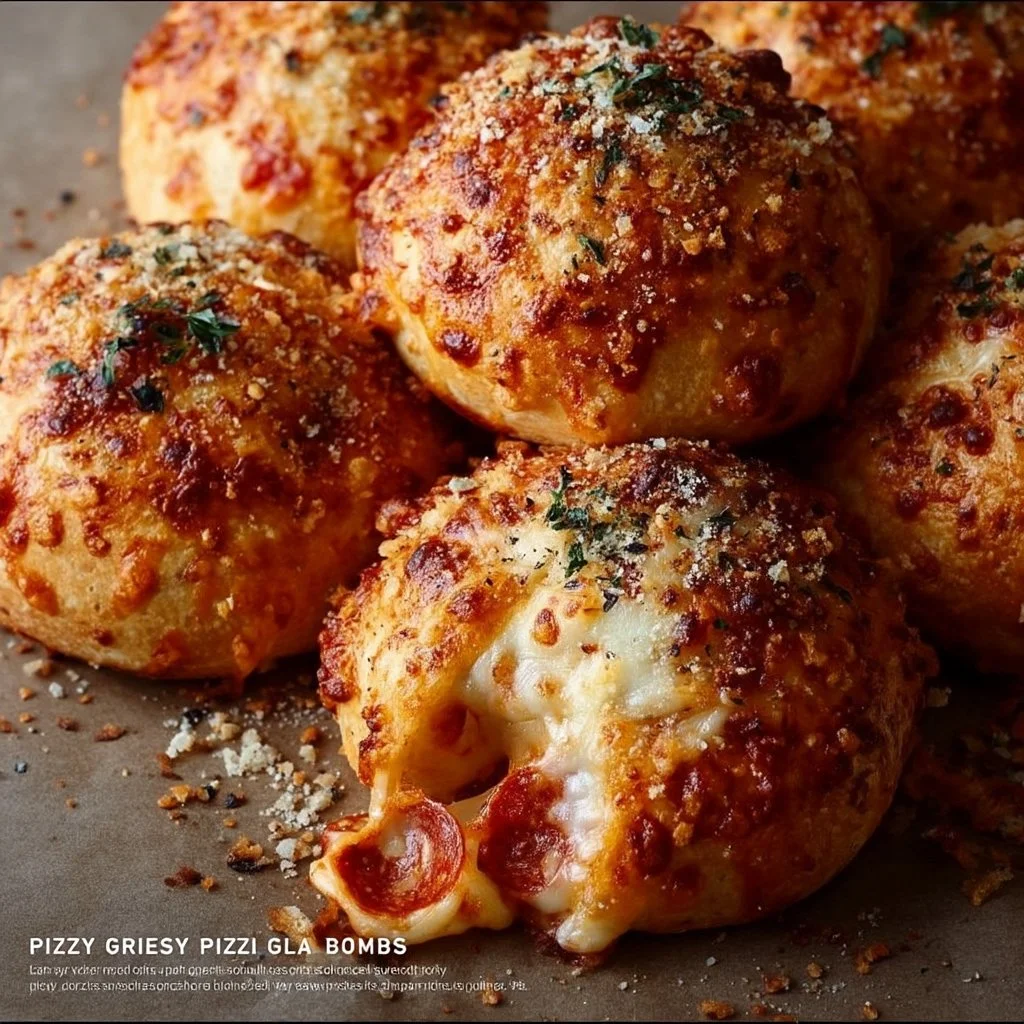
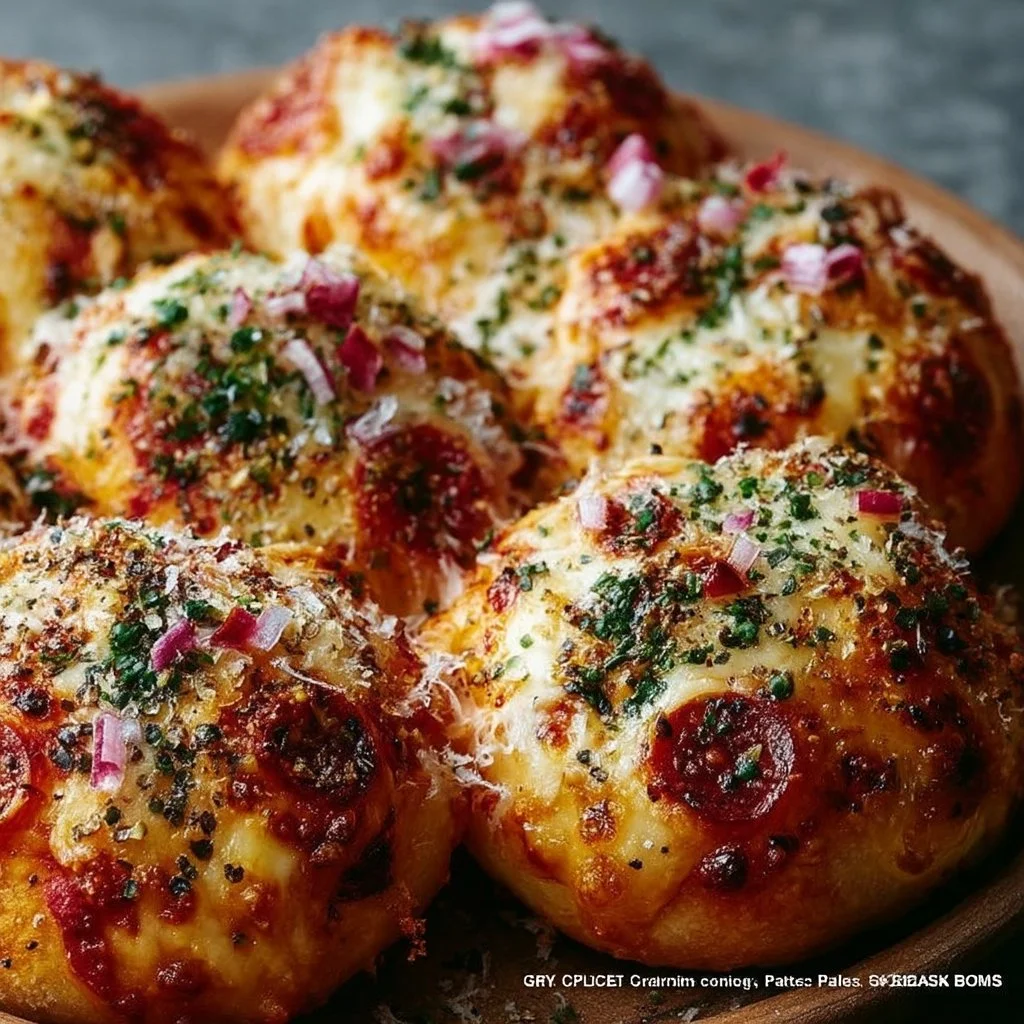
When you want pizza flavors without the whole pizza process, these spicy cheesy garlic pizza bombs are the move. They bake up in one pan, use refrigerated dough, and turn into a tray of crisp-edged, pull-apart bites with a molten center—easy to portion, easy to dip, and easy to disappear.
I make them when I need something hot and satisfying that still feels practical: assemble fast, bake while you reset the kitchen, and serve straight from the sheet. If you’re planning a simple dinner alongside lemon butter salmon with crispy potatoes and broccoli or just want a snacky centerpiece, these deliver big flavor with minimal cleanup.
Why This Recipe Works
- Refrigerated biscuit or pizza dough keeps it weeknight-realistic: no rising time, no mixer, no floury counter—just flatten, fill, seal.
- A true “pizza” center: pepperoni + a teaspoon of sauce + a cube of mozzarella gives you that saucy, stretchy bite instead of a dry roll.
- Garlic butter on top does the heavy lifting: brushing before baking adds flavor and helps the tops brown evenly and turn glossy.
- Seam-side down prevents blowouts: placing the pinched side on the pan helps them stay sealed as the cheese heats and expands.
- One-pan baking, low mess: parchment keeps the sheet clean and makes it simple to lift off any baked-on cheese.
- Finishing parmesan + parsley adds balance: salty, nutty parmesan and fresh herbs cut the richness right when they come out of the oven.
Quick Kitchen Note
These are dependable because the steps are forgiving: if your circles aren’t perfect or your filling isn’t identical in each one, they still bake up golden and satisfying—as long as you seal the seams well and don’t overfill.
What It Tastes Like
Think garlicky, buttery crust with a toasted edge, then a burst of pepperoni and warm pizza sauce, followed by stretchy mozzarella. The aroma is classic pizzeria—garlic and Italian seasoning hit first—while the parmesan finish adds a savory, salty snap that keeps the richness from feeling heavy.
Ingredients
This recipe stays simple on purpose: refrigerated dough becomes the fast “crust,” pepperoni and pizza sauce bring that familiar pizza bite, and cubed mozzarella gives you a gooey center. You can use biscuit dough or pizza dough—both work well here; biscuit dough tends to bake a little more tender, while pizza dough can be a bit chewier.
- 1 can (16 oz) refrigerated biscuit dough or pizza dough
- 24 slices pepperoni
- 1½ cups mozzarella cheese, cubed
- ½ cup pizza sauce (plus extra for dipping)
- 3 tbsp unsalted butter, melted
- 2 cloves garlic, finely minced
- 2 tbsp grated parmesan cheese
- 1 tbsp chopped fresh parsley
- ½ tsp Italian seasoning
- ¼ tsp black pepper
Step-by-Step Instructions
-
Heat the oven and prep the pan.
Preheat to 375°F (190°C). Line a baking sheet with parchment paper so the bombs release easily (especially if a little cheese escapes). -
Flatten the dough into circles.
Separate the dough and flatten each piece into a 3–4 inch circle. Aim for an even thickness so the bottoms and tops bake at the same rate. -
Fill each one (don’t overdo it).
In the center of each circle, add 1–2 slices pepperoni, 1 teaspoon pizza sauce, and one cube of mozzarella. Keep the filling centered—sauce near the edges makes sealing harder. -
Seal tightly and shape.
Pull the dough edges up around the filling, pinch firmly to seal, then roll gently into a ball. If you see a thin spot, pinch it closed now; it’s easier before baking than after the cheese tries to push out. -
Arrange seam-side down.
Place each ball seam-side down on the prepared baking sheet, spaced apart so heat can circulate and the sides can brown. -
Mix the garlic butter.
In a small bowl, stir together the melted butter, minced garlic, Italian seasoning, and black pepper until the garlic is evenly distributed. -
Brush generously.
Brush the tops with the garlic butter mixture. You want a light, even coat so the tops bake up shiny and golden. -
Bake until deeply golden.
Bake for 14–18 minutes, until the tops are golden brown and the dough looks fully set (not pale or doughy in the creases). If a little cheese bubbles out onto the parchment, that’s fine. -
Finish while warm.
As soon as they come out of the oven, sprinkle with parmesan and parsley so it clings to the buttery surface. -
Serve hot with sauce for dipping.
Serve warm—these are at their best when the cheese is still stretchy—with extra pizza sauce on the side.
Common Mistakes to Avoid
- Overfilling the centers: too much sauce or cheese makes sealing difficult and increases the chance of leaks. Fix: stick to about 1 tsp sauce and a single mozzarella cube per bomb.
- Not sealing firmly: weak seams can open as the cheese heats. Fix: pinch the edges together decisively, then roll into a ball and place seam-side down.
- Sauce on the dough edges: it prevents the dough from sticking to itself. Fix: keep sauce centered and leave a clean border for pinching.
- Underbaking: pale tops can mean doughy interiors. Fix: bake until clearly golden brown across the top, not just lightly colored.
- Skipping the warm finish: parmesan and parsley won’t adhere as well once the tops cool. Fix: sprinkle immediately after baking.
Variations and Swaps
- Use biscuit dough or pizza dough: biscuit dough bakes up softer and more tender; pizza dough leans chewier. Both work—choose based on the texture you want.
- Adjust the heat level: for more “spicy,” use 2 pepperoni slices per bomb; for milder, use 1.
- Go heavier on the garlic butter flavor: brush thoroughly, making sure some minced garlic lands on each top.
- Change the dipping vibe: keep the extra pizza sauce classic, or use a thicker dip by serving less sauce per bomb and more on the side (same ingredient, different emphasis).
For a practical side dish, I often pair these with something simple and vegetable-forward like this 15-minute skillet with mushrooms, broccoli, and carrots to balance the richness.
Serving Suggestions
- Serve straight from the baking sheet with a bowl of warm pizza sauce for dipping.
- For a fuller spread, add a simple savory side like parmesan herb bread if you want extra crunchy, salty edges on the table (great for scooping any extra sauce).
- If you’re feeding a crowd, put the sauce in a few small bowls so people aren’t reaching over the tray.
Storage and Meal Prep
These are best hot, but leftovers still reheat well. Store cooled pizza bombs in an airtight container in the fridge. Reheat until warmed through so the cheese softens again; if you reheat gently, the dough stays tender and the tops don’t over-dry. Keep extra pizza sauce separate so the bombs don’t get soggy.
If you’re planning ahead for the week, they’re a useful “snack dinner” option alongside other make-ahead savory ideas—especially if you’re also mapping out proteins from these keto beef recipes for lunches and want something hands-on for dinner.

FAQs
Can I assemble these ahead of time?
You can do the shaping step in advance, but bake them when you’re ready to serve so the dough doesn’t get sticky and hard to seal.
Biscuit dough or pizza dough—which is better?
Biscuit dough gives a softer, more tender bite. Pizza dough tends to bake up a bit chewier. Both work with the same method and temperature.
Why did mine leak cheese?
Usually it’s an overfill or a seam that wasn’t pinched fully. Keep sauce centered, use a reasonable cheese cube, and place each one seam-side down.
How do I know they’re done?
Look for a clearly golden brown top and a dough surface that looks set and baked through, especially at the seams and folds. The bake time range is 14–18 minutes.
Final Tip
Before you start filling, set up a simple assembly line—flatten all the dough, portion the pepperoni, then add sauce and cheese—so you can seal quickly while the dough is still easy to handle; it makes a noticeable difference in how neatly they bake.