Why This Sugar Free Victoria Sponge Still Tastes Bakery-Style
This Sugar Free Victoria Sponge works because it balances structure, moisture, and sweetness without relying on regular sugar or gluten. A mix of almond flour and gluten-free self-raising flour gives you a tender crumb with enough lift to feel like a classic sponge, not a dense almond cake. Psyllium husk quietly does the job gluten usually would, helping the batter hold together so the layers slice cleanly instead of crumbling. Separating the eggs and whipping the whites to soft peaks builds in that bakery-style lightness, even though the batter is naturally richer from the nuts and fats. The result is a cake that feels indulgent on the plate but still fits a diabetic-friendly and gluten-free lifestyle.
The moisture balance is carefully built rather than accidental. Melted butter plus a little neutral oil keeps the crumb soft for days, while Greek yoghurt and milk add gentle tang and extra tenderness. Allowing the batter to rest for 5–10 minutes before baking lets the gluten-free flours and psyllium fully hydrate, which removes that grainy, “health-cake” texture so many sugar-free bakes suffer from. Vanilla bean paste boosts aroma and perceived sweetness, so you don’t miss the sugar, and the naturally sweet strawberry chia jam with fresh berries delivers that classic Victoria sponge flavor without a sugar crash. Paired with softly whipped double cream, every bite tastes like a proper British teatime treat—just with better blood sugar control.
How to Make This Sugar Free Victoria Sponge Step by Step
To make your Sugar Free Victoria Sponge light instead of heavy, start with your tins and oven. Preheat to 160°C fan / 180°C conventional / 350°F and line two 7-inch round tins with parchment, then lightly grease them so the cakes release cleanly. In a medium bowl, whisk together the almond flour, gluten-free self-raising flour, baking powder, and psyllium husk until there are no visible clumps. This dry mix sets the structure, so combine it well now to avoid overmixing later. Set the bowl aside so you can focus on building volume into the eggs.
Separate your eggs, then, in a large bowl, whisk the yolks with the melted and slightly cooled butter, neutral oil, Greek yoghurt, both measures of vanilla bean paste, and the milk. You want a smooth, glossy mixture with no streaks of fat or yoghurt; if it looks split, keep whisking gently until it comes together. Tip your dry ingredients into the wet and fold with a spatula until just combined—stop as soon as you no longer see dry patches. Let the batter rest for 5–10 minutes so the gluten-free flours hydrate and the psyllium can swell; this is one of the big differences between a damp, tender crumb and a grainy one.
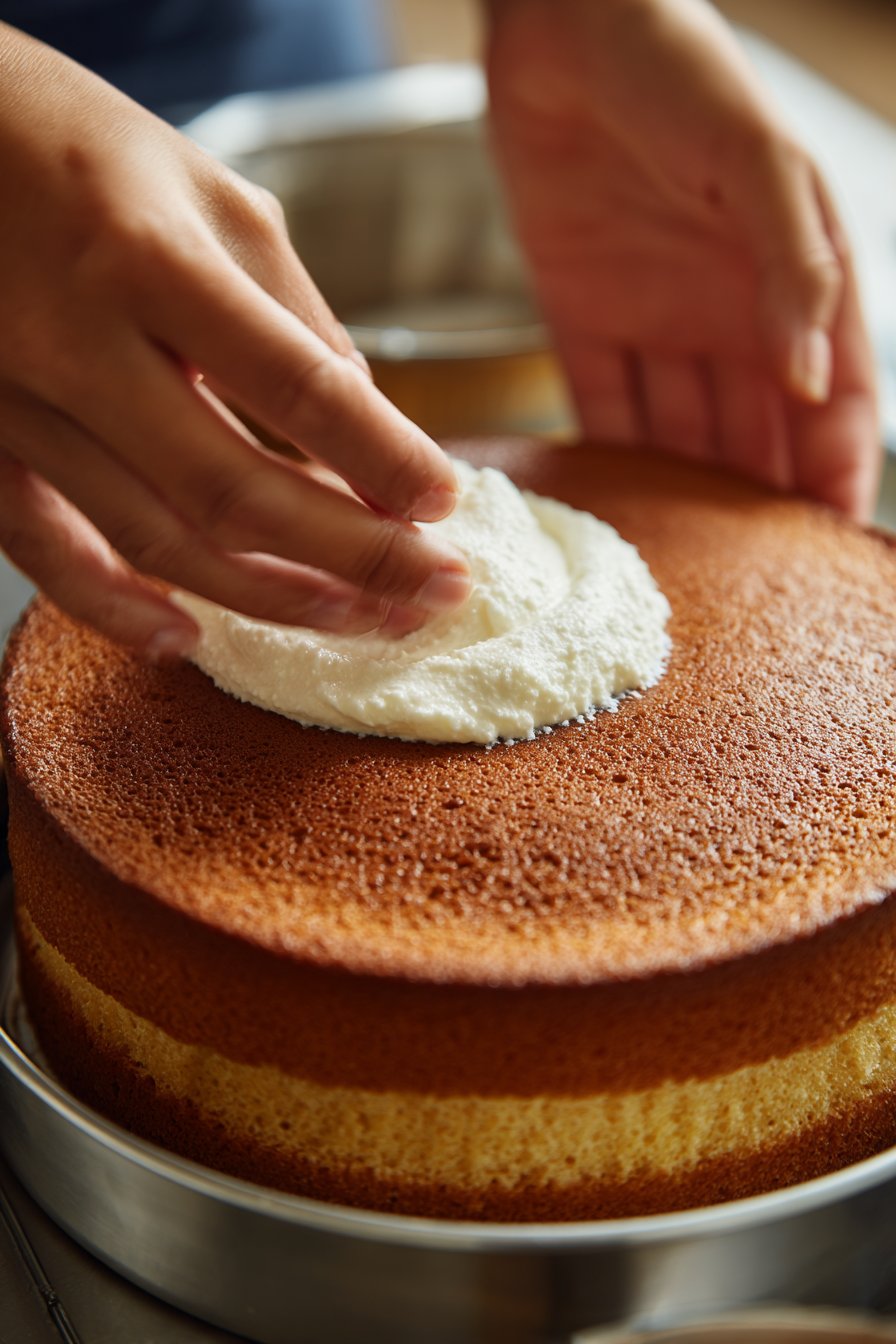
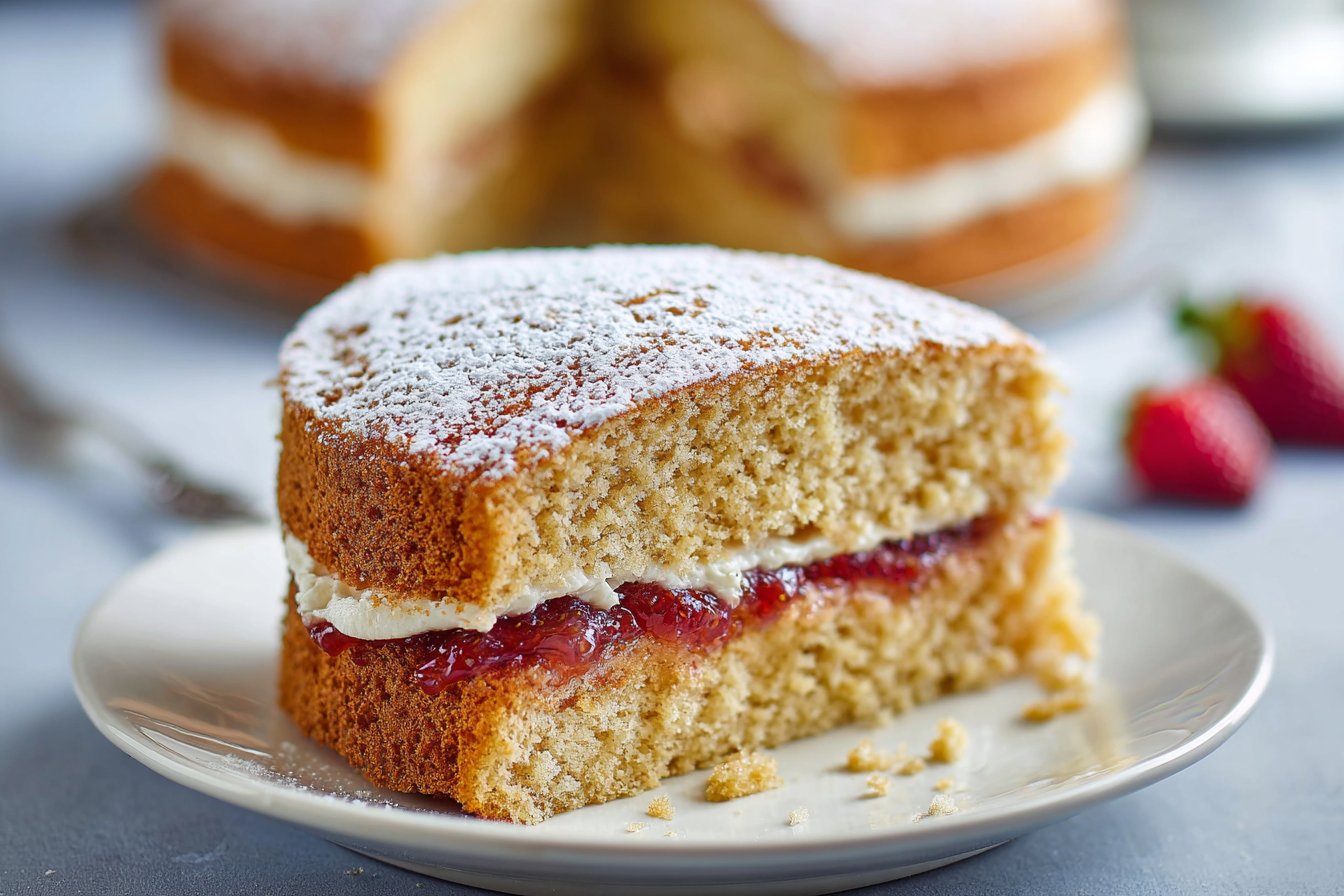
While the batter rests, whisk the egg whites in a completely clean, dry bowl until they reach soft peaks that gently curl over when you lift the whisk. Take a scoop of the whites and fold it into the batter to loosen it, using wide, gentle strokes, then fold in the rest in 2–3 additions, keeping as much air as possible. Divide the mixture evenly between the tins, smoothing the tops lightly without pressing down. Bake for around 35–40 minutes, or until the tops are golden and a skewer comes out clean. Cool in the tins for 10 minutes, then transfer to a rack to cool completely before filling with whipped cream, Strawberry chia seed jam, and chopped fresh strawberries for that classic Victoria sponge finish without the sugar crash.
Time, Prep, and Storage Plan for Your Sugar Free Victoria Sponge
From start to finish, this Sugar Free Victoria Sponge takes about 1 hour, with 20 minutes of hands-on prep and roughly 40 minutes of baking. To keep things smooth, measure and weigh all your ingredients before you start, and line your tins first so the batter doesn’t sit too long once it’s ready. I like to whip the egg whites while the batter rests for those 5–10 minutes, so you’re making use of the “waiting” time and staying on track. Expect an extra 10–15 minutes after baking for cooling the layers enough to handle, and at least 30–45 minutes more before you fill them so the cream doesn’t melt. If you’re planning this for a party, bake the sponges in the morning and fill them closer to serving time for the best texture.
You can make the cake layers 1 day ahead: once fully cooled, wrap each sponge tightly in parchment and then in foil, and keep them at room temperature if your kitchen is cool, or in the fridge if it’s very warm. Only add the cream and strawberry chia jam filling within about 4–6 hours of serving, as the whipped cream is perishable and the gluten-free sponge will gradually soften from the moisture. Once filled and assembled, store your Sugar Free Victoria Sponge in the fridge, loosely covered, for up to 2 days; the texture stays moist, though the top will lose a little of its just-baked lightness. For the cleanest slices, chill for at least 30 minutes before cutting, then let it sit at room temperature for about 10–15 minutes so the crumb and cream relax. Leftover slices keep well in an airtight container in the fridge, and you can even freeze undecorated sponge layers for up to 2 months—just thaw them in the fridge overnight before filling.
Flexible Options and Serving Notes for Your Sugar Free Victoria Sponge
This Sugar Free Victoria Sponge is easy to adapt without losing its light texture or gentle sweetness. For the filling, you can swap the Strawberry chia seed jam for a raspberry or mixed-berry chia jam, or even a layer of lightly mashed fresh berries if you prefer very low sweetness. If you need the cake to be completely dairy-free, use coconut yoghurt in the batter, then fill with whipped coconut cream instead of double cream. To keep it gluten-free, always check that your baking powder and any decorative toppings are certified gluten-free as well. You can bake the sponge in one deep 8-inch tin and slice it in half once cooled, but reduce the oven temperature slightly and bake a little longer, checking from around 35–40 minutes.
For serving, this Sugar Free Victoria Sponge is at its best once it has rested for 30–60 minutes after assembling, which allows the cream and jam to settle into the crumb. Serve it at room temperature rather than fridge-cold so the almond flour base tastes softer and the vanilla notes come through. If you need to make it ahead for a celebration or afternoon tea, you can bake the sponges a day in advance, wrap them well, and store at room temperature, then fill with cream and jam just before guests arrive. Leftovers keep well in the fridge for up to 2 days; the texture firms slightly, so let slices sit out for 15 minutes before serving. A small slice pairs nicely with unsweetened tea or coffee, which helps keep the overall experience balanced for anyone watching their blood sugar. For a special occasion spread, you can serve this alongside a sugar-aware option like a crustless quiche or savory frittata to round out the table.
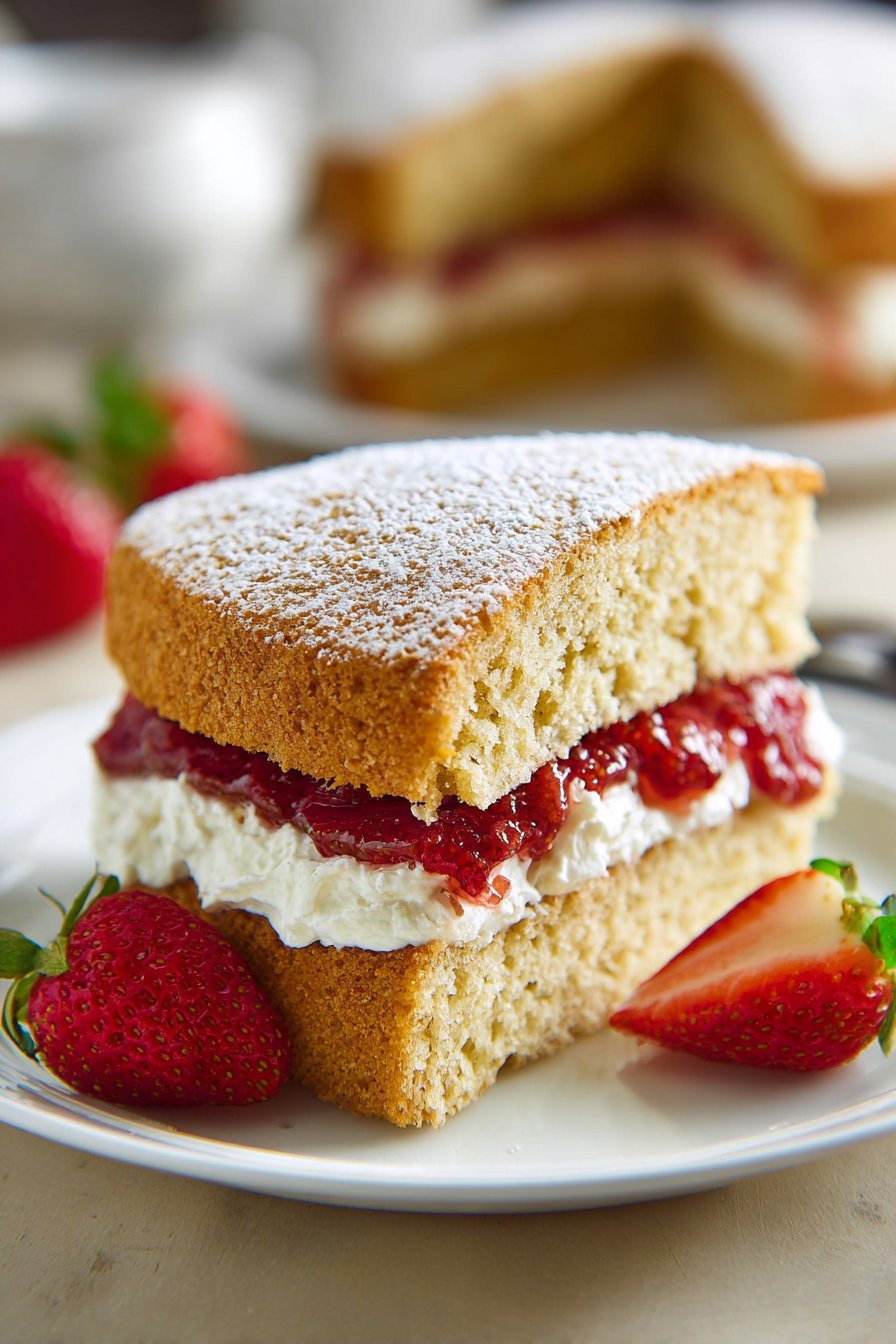
Serving of Sugar Free Victoria Sponge
Conclusion
I hope this recipe shows you that a beautiful sponge cake doesn’t need heaps of sugar to feel special. A simple, light, and tender Sugar Free Victoria Sponge has a way of turning an ordinary afternoon into a little celebration—whether you’re serving it for a birthday, a Sunday tea, or just because you felt like baking something lovely.
When you slice into the cake and share it with the people you care about, you’re not just serving dessert—you’re creating a small moment for everyone to pause, chat, and enjoy something you made with intention. That’s the heart of home baking for me: practical, doable recipes that still feel like an occasion.
If you haven’t tried it yet, save this recipe, preheat your oven, and give it a go. Adjust the sweetness to your taste, play with fillings, and make it your own. And if it becomes “the cake” your family asks for again and again, even better.
For more delicious recipes like this, follow us on social media!
Instructions Process of Sugar Free Victoria Sponge
Is this Sugar Free Victoria Sponge suitable for diabetics?
This Sugar Free Victoria Sponge avoids refined sugar and relies on lower-glycemic sweeteners and a homemade strawberry chia jam instead of traditional jam. Almond flour, Greek yogurt, and gluten-free self-raising flour help keep the overall carbohydrate load more balanced. That said, it still contains carbs from the flours, cream, and berries, so portion size matters. If you manage diabetes, **always check the nutrition info and discuss with your healthcare professional** to see how it fits your targets. Enjoy a small slice, pair it with a protein-forward meal, and keep an eye on your usual blood sugar response.
Is this Sugar Free Victoria Sponge gluten free and safe for celiacs?
Yes, this cake is designed to be completely gluten free when you use certified gluten-free self-raising flour and baking powder. Almond flour, psyllium husk, and gluten-free flour work together to create a tender, bakery-style crumb without wheat. If you have celiac disease, be sure all your ingredients (especially baking powder, vanilla, and oats if you swap anything) are clearly labeled gluten free. Bake in a clean, de-glutened kitchen to avoid cross-contamination from trays, tins, and utensils. Line the pans well and use separate utensils from any wheat-based baking.
How can I keep the sponge light instead of dense or gummy?
To keep your Sugar Free Victoria Sponge airy, avoid overmixing once you combine the wet and dry ingredients. Let the batter rest for 5–10 minutes so the gluten-free flours hydrate; this reduces graininess and helps the structure. When you whip your egg whites, take them only to soft peaks, then gently fold them through the batter in 2–3 additions with a spatula. If you see a few small streaks of egg white, that’s fine—better under-mixed than deflated. Weigh your ingredients accurately and bake as soon as the batter is ready for the best rise.
Recipe
Sugar Free Victoria Sponge
Ingredients
Method
- Preheat the oven to 350°F. Line the bases of two 7-inch round cake tins with parchment paper and lightly grease the sides.
- In a medium bowl, whisk together the almond flour, gluten-free self-raising flour, baking powder, and psyllium husk until evenly combined, then set aside.
- In a large mixing bowl, add the egg yolks, melted and cooled butter, neutral oil, Greek yoghurt, vanilla bean paste, and milk, then whisk until smooth and fully emulsified.
- Add the dry ingredient mixture to the yolk mixture and fold gently with a spatula until just combined and no dry patches remain.
- Let the batter rest at room temperature for 5 to 10 minutes to allow the gluten-free flours and psyllium husk to hydrate.
- While the batter rests, place the egg whites in a clean, dry bowl and whisk with an electric mixer to soft peaks that gently curl over when the beaters are lifted.
- Add about one-third of the whipped egg whites to the batter and fold in gently to loosen the mixture, then fold in the remaining egg whites in 2 additions, using broad, gentle strokes to keep as much air as possible.
- Divide the batter evenly between the prepared tins and gently smooth the tops with a spatula without pressing down.
- Bake for 40 minutes, or until the cakes are golden on top and a skewer inserted into the center of each sponge comes out clean.
- Remove the tins from the oven and let the cakes cool in the tins for 5 to 10 minutes, then run a thin spatula around the edges and carefully transfer the cakes to a wire rack to cool completely.
- Once the cakes are fully cool, whip the cold double cream in a clean bowl to soft peaks.
- Place one sponge layer on a serving plate, spread the strawberry chia seed jam evenly over the surface, then scatter the chopped strawberries over the jam.
- Spoon or pipe the whipped cream over the strawberries in an even layer, then gently place the second sponge on top, pressing very lightly to sandwich the layers.
- Chill the assembled cake for 20 to 30 minutes to help it set before slicing and serving.
Notes
- A completely clean, grease-free bowl is essential for whipping egg whites to proper soft peaks.
- Let the sponges cool fully before adding the cream to prevent the filling from melting and sliding out.
- For neat slices, use a sharp serrated knife and wipe the blade between cuts.