

Why This Sugar Free Chocolate Pudding Pie Delivers Bakery-Level Results
This Sugar Free Chocolate Pudding Pie works because it layers texture and flavor the way a good bakery pie does, without the fussy steps. The stabilized pudding filling—thanks to the combo of sugar free instant pudding and heavy whipping cream—sets up thick and sliceable, so you get clean wedges instead of a collapsing, soupy center. Folding in frozen whipped topping keeps the filling light and airy, so it feels decadent without the weight (or sugar crash) of traditional custard pies. Letting the prepared crust chill before filling it gives you a firmer base that doesn’t get soggy from the creamy chocolate layer.
The topping is where this pie really feels “bakery-style.” Softened cream cheese, sugar free powdered sweetener, extra whipping cream, and vanilla bean paste come together into a rich, pipeable cream that holds its shape for hours in the fridge. It gives you that tall, billowy look you see in bakery cases, but you never have to turn on the oven or cook a custard on the stove. Everything is whipped in bowls, layered, and chilled—perfect for busy days or holiday menus where your oven is already packed with other recipes like chocolate mousse cups or a crustless cheesecake.
From a practical standpoint, this no-bake Sugar Free Chocolate Pudding Pie is very forgiving. The instant pudding helps the filling thicken quickly, so even if you whip it slightly less or more than ideal, it still sets beautifully. Heavy cream adds body and mouthfeel to make up for the lack of traditional sugar, so the texture stays lush instead of watery or “diet-like.” Because it uses sugar free pantry staples and a flexible crust choice (regular, low-carb, or nut-based), you can easily adjust it to your needs and still count on reliable results every time.
How to Make This No-Bake Sugar Free Chocolate Pudding Pie
Start by chilling your prepared pie crust so it firms up a bit while you mix the filling; a cold crust helps the layers set cleanly and slice neatly later. In a large bowl, add the dry sugar free chocolate instant pudding and the 3 cups of heavy whipping cream, then beat on medium speed until the mixture looks thick, smooth, and glossy with no dry streaks. This usually takes 2–3 minutes; if your mixer leaves clumps on the sides, stop and scrape them down once. When the base looks like a rich chocolate mousse, gently add the frozen whipped topping and mix on low speed just until it disappears into the pudding—overmixing can deflate the air and make your Sugar Free Chocolate Pudding Pie a bit dense instead of light.
Take the crust out of the fridge and use a rubber spatula to scoop the chocolate filling into the shell, spreading it evenly all the way to the edges so there are no gaps. Smooth the top so it’s level; this makes it easier to add your cream topping later and gives that bakery-style finish. Cover the pie tightly with plastic wrap, making sure it doesn’t touch the surface, and refrigerate for at least a few hours or until the filling is fully set and slices hold their shape. When you’re close to serving, whisk together the room-temperature cream cheese, sugar free powdered sugar, 1¼ cups whipping cream, and vanilla bean paste until you have a thick, smooth, pipeable cream. Spread or pipe this over the chilled chocolate layer, then chill for another 15–20 minutes to lock everything in before cutting clean slices of your Sugar Free Chocolate Pudding Pie.
Time, Prep, and Storage Plan for Sugar Free Chocolate Pudding Pie
You can have this Sugar Free Chocolate Pudding Pie fully assembled in about 20 minutes, plus at least 2–4 hours of chilling time for clean slices. I like to break the work into 2 short bursts: first, prep the crust (or unwrap a ready-made one) and mix the pudding layer, then let the pie chill while you prep dinner or pack lunches. Plan for about 10 minutes to whip the pudding and heavy cream, another 5 minutes to fold in the whipped topping and spread the filling, and a final 5 minutes before serving to make the fluffy vanilla topping. If you’re making this for guests, assemble it the night before so it sets completely and the flavors meld.
This Sugar Free Chocolate Pudding Pie keeps well, which makes it perfect for make-ahead desserts or weekly treats. Store the finished pie covered tightly with plastic wrap or a fitted lid in the refrigerator for 3–4 days; beyond that, the crust softens and the topping can start to weep. For best texture, avoid freezing the fully assembled pie, as the instant pudding and whipped components can turn grainy once thawed. If you need to work ahead, you can prep the crust and chocolate filling up to 24 hours in advance, chill it, and then whip and add the vanilla topping right before serving. Leftover slices taste great next day; just smooth the edges with a knife if the topping has shifted and serve it chilled straight from the fridge.
Flexible Options and Serving Notes for Sugar Free Chocolate Pudding Pie
You can take this Sugar Free Chocolate Pudding Pie in a lot of directions without making extra work for yourself. For the crust, use a nut crust for a more keto-friendly spin, a classic sugar free graham-style crust for something lighter, or a traditional baked pie shell if you prefer that bakery-style snap. If you like a deeper chocolate flavor, fold a few tablespoons of unsweetened cocoa powder into the pudding mixture and taste as you go, adding a touch more sugar free powdered sweetener only if needed. You can also swap part of the heavy cream with half-and-half for a slightly lighter texture, just keep at least half of the total as heavy cream so the filling still sets firmly. For a neater slice, chill the pie for at least 4 hours, and wipe your knife clean between cuts.
When it comes to serving, this Sugar Free Chocolate Pudding Pie shines chilled, with the topping whipped just before it goes to the table for the best volume and texture. Add a light dusting of cocoa powder, sugar free chocolate shavings, or a few fresh berries on top to give it a bakery-style finish without adding sugar. If you’re serving a mixed crowd, pair slices with a scoop of sugar free vanilla ice cream or a side of fresh strawberries so everyone can customize their plate. The pie holds well in the refrigerator for 2–3 days; just keep it covered so the cream doesn’t pick up other fridge odors. If the topping softens slightly after a day, a quick whisk before serving will bring it back to life.
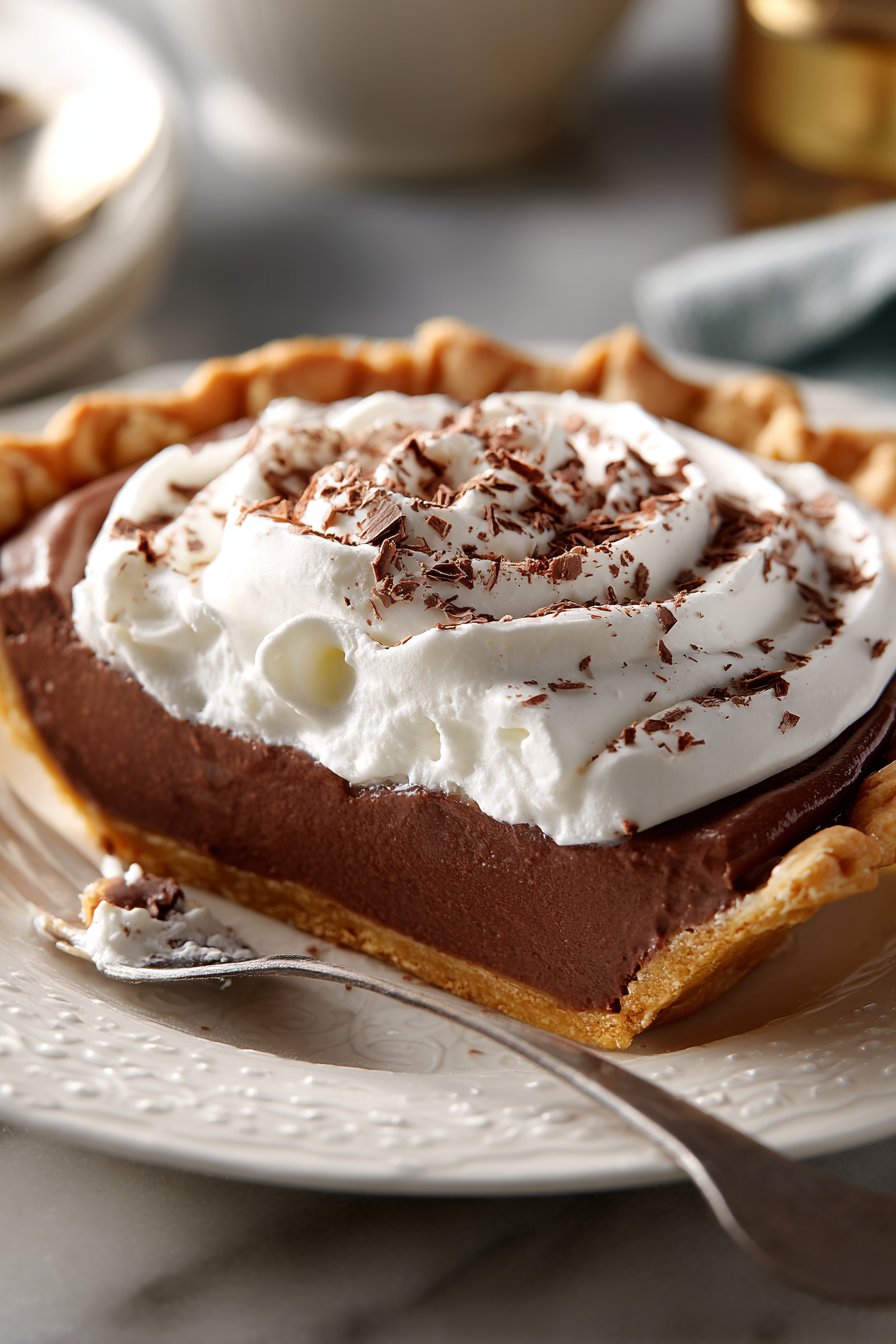
Serving of Sugar Free Chocolate Pudding Pie
Conclusion
When you strip dessert down to simple, honest ingredients and a no-bake method, you get a treat that fits real life—busy schedules, surprise guests, and all. This Sugar Free Chocolate Pudding Pie is the kind of recipe that quietly becomes “the one everyone asks for,” because it feels a little special without feeling fussy. You can whisk it together in minutes, let the fridge do the work, and still serve a slice that feels worthy of a celebration.
I love how a pie like this pulls people to the table. It’s easy enough for a Tuesday night, but still makes birthdays, holidays, and casual get-togethers feel more memorable. One clean slice, a few crumbs on the plate, and suddenly everyone is lingering a bit longer, talking a bit more. That’s the real magic here: you’re not just making dessert—you’re making a small moment that feels generous and thoughtful.
If this pie sounds like something your family or friends would love, I hope you’ll give it a try and make it your own. For more delicious recipes like this, follow us on social media!

Instructions Process of Sugar Free Chocolate Pudding Pie
Is this Sugar Free Chocolate Pudding Pie diabetes-friendly?
This Sugar Free Chocolate Pudding Pie uses sugar free chocolate pudding mix and sugar free powdered sweetener, so it’s lower in added sugars than a traditional pie. That said, “sugar free” does not always mean “carb free,” and the pudding mix, crust, and toppings can still impact blood sugar. Always read the labels on your specific products, especially the pie crust and whipped topping. If you manage diabetes or follow a strict low-carb plan, it’s smart to confirm the carb count per slice and talk with your doctor or dietitian. You can also choose a nut-based or keto crust and a keto-certified pudding mix to keep carbs even lower.
What kind of crust works best for Sugar Free Chocolate Pudding Pie?
You can use almost any prepared 9-inch crust: traditional pastry, graham-style, chocolate, or a nut-based keto crust. For a fully sugar free dessert, check the label and choose a crust with no added sugar or make a homemade almond flour or pecan crust. A pre-baked pastry crust will give you a classic “bakery-style” feel, while a nut crust adds richness and extra texture. If your crust is very delicate, chill it well before filling so it doesn’t crack. Make sure the crust is completely cool and set before you add the pudding mixture so the filling layers cleanly.
How far in advance can I make this Sugar Free Chocolate Pudding Pie?
You can make this pie up to 1 day ahead, which makes it great for holidays and parties. Prepare the crust and filling, smooth it into the shell, cover tightly, and refrigerate until firm. I like to wait and whip the cream topping right before serving so it looks fresh and holds its shape best. If you prefer, you can top the pie a few hours in advance, but avoid more than 24 hours to prevent any weeping or deflation. Keep the pie well covered in the refrigerator so it doesn’t absorb other fridge odors.
Recipe

Sugar Free Chocolate Pudding Pie
Ingredients
Method
- Place the prepared, cooled pie crust in the refrigerator to chill while you make the filling.
- In a large mixing bowl, add the dry sugar free chocolate instant pudding mix and 3 cups of cold heavy whipping cream.
- Beat on medium speed with a hand mixer or stand mixer until the mixture is thick, smooth, and glossy, about 2 to 3 minutes, scraping down the sides of the bowl once.
- Add the thawed frozen whipped topping to the chocolate mixture.
- Mix on low speed just until the whipped topping is fully incorporated and the filling looks light and uniform, then stop mixing to avoid deflating it.
- Remove the chilled pie crust from the refrigerator and pour the chocolate filling into the crust.
- Use a rubber spatula to spread the filling evenly to the edges and smooth the top.
- Cover the pie loosely with plastic wrap, making sure the wrap does not touch the surface, and refrigerate for at least 4 hours or until the filling is fully set and slices hold their shape.
- When you are ready to serve, place the softened cream cheese in a clean mixing bowl and beat until smooth.
- Add the sugar free powdered sugar to the cream cheese and beat until well combined and creamy.
- Pour in 1 1/4 cups cold heavy whipping cream and the vanilla bean paste.
- Beat on medium-high speed until the mixture becomes thick, smooth, and holds soft peaks that are spreadable or pipeable.
- Remove the chilled pie from the refrigerator and spread or pipe the cream cheese vanilla topping evenly over the chocolate layer.
- Refrigerate for another 15 to 20 minutes to allow the topping to set slightly before slicing and serving.
Notes
- Chill the pie for several hours or overnight for the cleanest slices and best texture.
- Do not overmix the filling after adding the whipped topping, or it can lose volume and become dense.
- For a stronger vanilla flavor in the topping, increase the vanilla bean paste slightly, adjusting to taste.


