

The Practical Why Behind It
Zero Carb Yogurt Bread exists for the exact days when you want real-bread satisfaction without the blood sugar spike, bloat, or long ingredient list. The high-protein base of eggs and full-fat Greek yogurt gives you stable energy, not the crash you get from white flour. That means you can treat this like “bread” for breakfast or sandwiches and still stay on track with low-carb, keto, or gluten-free goals. Because the recipe skips starches and grains entirely, it also works nicely with other low-carb meals you might love, like a crustless quiche or a loaded egg bake. You get structure and chew from smart ingredients, not from hidden carbs.
From a practical cooking standpoint, every ingredient in this Zero Carb Yogurt Bread earns its place. The Greek yogurt adds moisture and tenderness so your loaf doesn’t turn out rubbery, even with so many eggs. Xanthan gum or psyllium husk provides the “glue” that gluten usually would, so the slices hold up for toasting and topping. A touch of baking powder and melted butter (or coconut oil) create those light, bakery-style bubbles and a golden, fragrant crust. You mix everything in one bowl, pour, and bake—no kneading, no proofing, and no rise time to babysit.
Just as important, this recipe makes weekday eating simpler. One loaf prepped on Sunday can cover toast-style breakfasts, quick sandwiches, and snack plates for days. It reheats well in the toaster or skillet, and the neutral, slightly tangy flavor works for both savory toppings like eggs and avocado or more classic “bread” uses like grilled cheese. If you already lean on low-carb staples such as almond flour crackers or cloud bread, this Zero Carb Yogurt Bread gives you a sturdier, more versatile option that feels much closer to the bakery loaf you actually crave.
Step-by-Step Method for Perfect Zero Carb Yogurt Bread
Start by heating your oven to 350°F (175°C) so it’s fully ready when the batter is mixed. Line a standard loaf pan with parchment paper and let it overhang the sides for easy lifting, or grease it very well, especially in the corners. In a large mixing bowl, whisk the eggs, full-fat Greek yogurt, and melted butter or coconut oil together until completely smooth and uniform—look for no streaks of yolk or oil. This is your main structure and moisture base, so give it a solid minute of whisking. If your yogurt is very thick, take an extra 30–60 seconds to beat air into the mixture; that helps your Zero Carb Yogurt Bread rise a bit lighter.
In a separate small bowl (or directly over the main bowl if you’re confident), add the baking powder, salt, and xanthan gum or psyllium and sprinkle them evenly over the surface before whisking in. This helps prevent clumps of gum that can form gummy pockets. If using almond flour, whisk it in gently until just combined—you want a thick but pourable batter, similar to a loose pancake batter. Avoid overmixing at this stage; once everything looks even, stop. Pour the batter into your prepared loaf pan, smooth the top with a spatula, and tap the pan lightly on the counter to release any large air bubbles.
Transfer the pan to the center rack of your preheated oven and bake for 35–45 minutes, depending on your oven and pan material. You’re looking for a golden top, edges that pull just slightly from the sides, and a toothpick in the center that comes out clean or with a few dry crumbs. If the top browns too quickly but the center still looks very wet, tent loosely with foil and continue baking. Let the Zero Carb Yogurt Bread cool in the pan for 10 minutes, then lift it out (or gently turn it out) onto a wire rack. Allow it to cool completely before slicing—this sets the protein structure and keeps your slices neat and tender, perfect for toasting or topping like you would with my protein-rich breakfast bakes or low-carb savory loaves.
Make-Ahead and Storage Notes for Zero Carb Yogurt Bread
Zero Carb Yogurt Bread keeps surprisingly well, which makes it a great option for weekly meal prep. Once your loaf has cooled completely, slice it with a sharp serrated knife and store the slices in an airtight container in the refrigerator for up to 5 days. I recommend placing a small piece of parchment between every 2–3 slices to prevent sticking, since the high egg and yogurt content can make the crumb tender and slightly tacky when chilled. If you like a firmer bite for toast or sandwiches, chill the bread for at least 2 hours before slicing—that brief time in the fridge helps it set and slice more cleanly. When you’re ready to eat, warm slices in a skillet with butter, in a toaster oven, or under the broiler for 1–2 minutes until the edges turn lightly golden.
This Zero Carb Yogurt Bread also freezes very well, but how you freeze it matters. For the best texture, slice the cooled loaf, lay the pieces in a single layer on a baking sheet, and freeze until solid, then transfer them to a freezer bag and press out as much air as possible. Frozen slices keep their quality for about 2 months; after that, they can dry out. To reheat, go straight from the freezer to a warm nonstick pan, toaster oven, or air fryer—no need to thaw first. If the bread feels slightly drier after freezing, a thin spread of butter, cream cheese, or avocado brings back moisture and makes it perfect alongside a quick egg breakfast or a bowl of soup, much like how I use my higher-carb sandwich loaves and low-carb skillet breads.
Variations and How to Serve It
Zero Carb Yogurt Bread is surprisingly versatile, so treat this as a base recipe you can tweak to match your week. For a savory version, stir in 2–3 tablespoons of finely grated Parmesan, a teaspoon of Italian seasoning, or a minced garlic clove before baking. If you want a softer “sandwich” texture, use psyllium husk instead of xanthan gum and skip the almond flour, which keeps the crumb a bit lighter. For a more rustic, nutty loaf, go with the almond flour option and add a tablespoon of sunflower or sesame seeds to the top before baking. You can also bake the batter in a muffin tin (fill wells about ¾ full) to create quick, portion-controlled rolls—start checking around 18–20 minutes.
For serving, think of this Zero Carb Yogurt Bread as your everyday stand-in for toast or a soft dinner roll. Slice it thick for grilled cheese, breakfast egg sandwiches, or open-faced tuna melts; the sturdy, protein-rich structure handles toppings well once it cools completely. For breakfast, toast a slice and top it with avocado, smoked salmon, or a swipe of almond butter for a balanced, low-carb plate. At lunch or dinner, serve it alongside soups, salads, or roasted chicken, or cube it and toast it to make quick low-carb croutons. If you already enjoy low-carb staples like a crustless quiche or sheet pan roasted chicken and vegetables, this bread fits easily into that rotation as a reliable, no-guilt side.
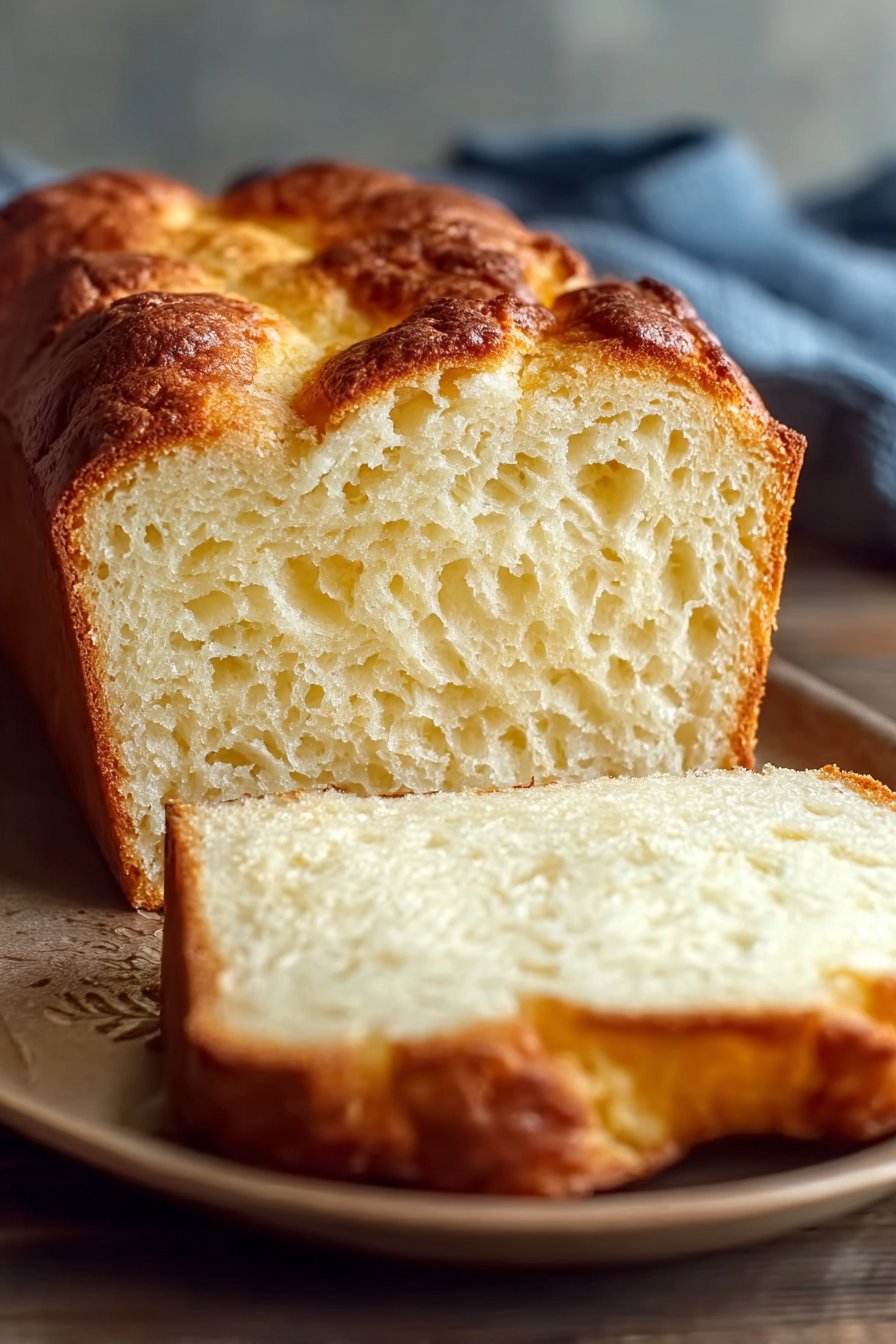
Serving of Zero Carb Yogurt Bread
Conclusion
This bread is one of those simple kitchen wins that feels a little bit special every time you make it. It comes together with everyday ingredients, but the result is a tender, satisfying loaf that fits into your goals without feeling restrictive. I love how a warm slice with butter, a cup of coffee, and a quiet moment can reset an entire day.
What I enjoy most is how a recipe like this invites people in—family wandering into the kitchen to see what smells so good, friends asking for “just a small slice,” or kids helping themselves to a piece after school. Baking your own Zero Carb Yogurt Bread turns an ordinary day into something a bit cozier and more connected.
I hope you give this recipe a try and make it your own—toast it, top it, or share it at the table. Keep it in your weekly rotation and let it be one of those reliable, comforting staples you can always count on.
For more delicious recipes like this, follow us on social media!
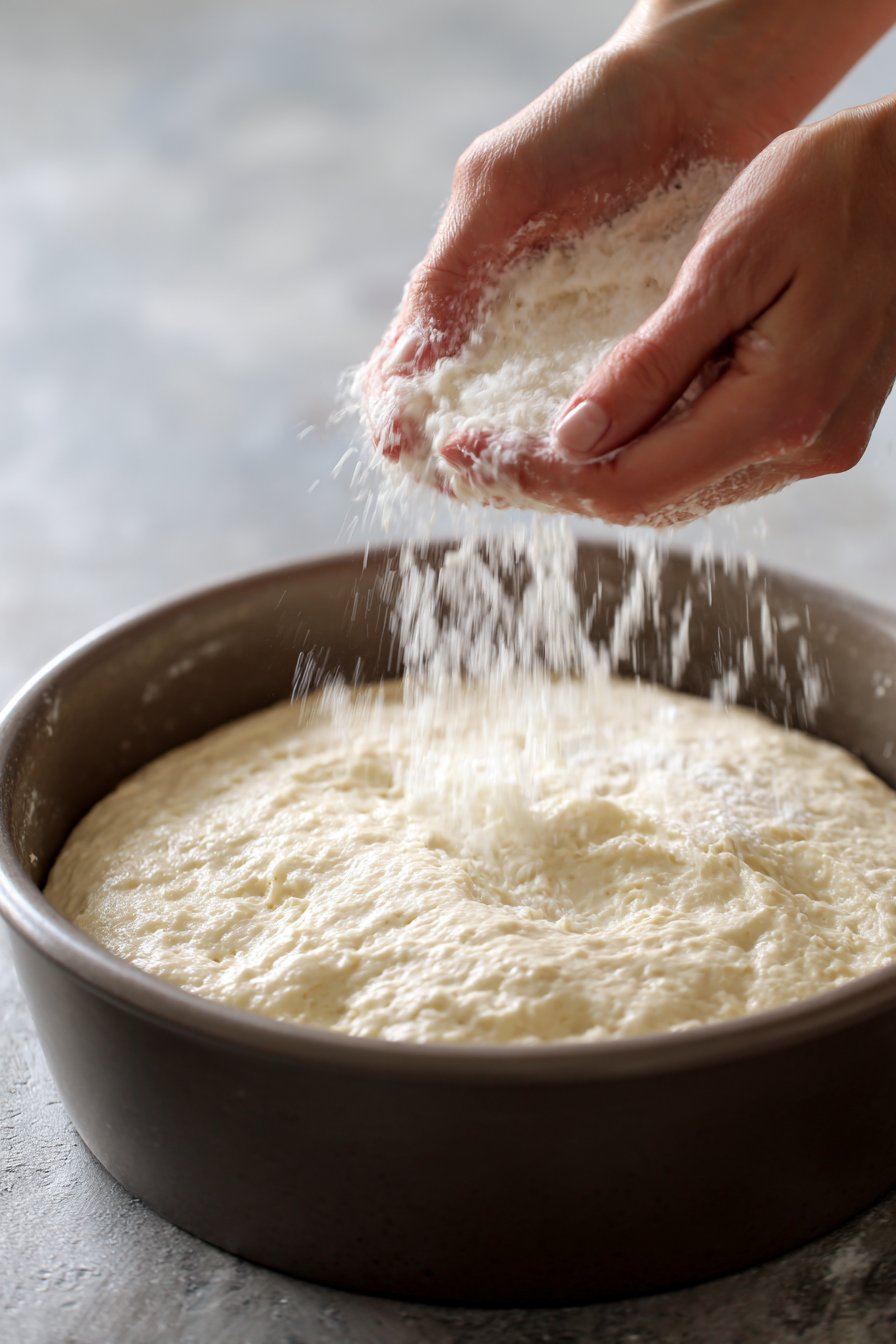
Instructions Process of Zero Carb Yogurt Bread
Recipe

Zero Carb Yogurt Bread
Ingredients
Method
- Preheat the oven to 350°F. Line a standard loaf pan with parchment paper or grease it well.
- Add the eggs, Greek yogurt, and melted butter or coconut oil to a large mixing bowl and whisk until completely smooth.
- Sprinkle the baking powder, salt, and xanthan gum or psyllium evenly over the egg mixture, then whisk until fully combined.
- If using almond flour, add it to the bowl and whisk or stir just until the batter is smooth and uniform.
- Pour the batter into the prepared loaf pan, smooth the top with a spatula, and tap the pan lightly on the counter to release any large air bubbles.
- Bake for 35 to 45 minutes, until the top is golden, the edges are just pulling from the sides, and a toothpick inserted in the center comes out clean.
- Cool in the pan for 10 minutes, then transfer the loaf to a wire rack and let it cool completely before slicing.
Notes
- If the top browns too quickly, tent the loaf loosely with foil for the last 10 minutes of baking.
- Psyllium will give a slightly more bread-like, chewy texture, while xanthan gum keeps the crumb a bit lighter.
- Store sliced bread in an airtight container in the refrigerator for up to 5 days, or freeze slices with parchment between them for up to 2 months.


