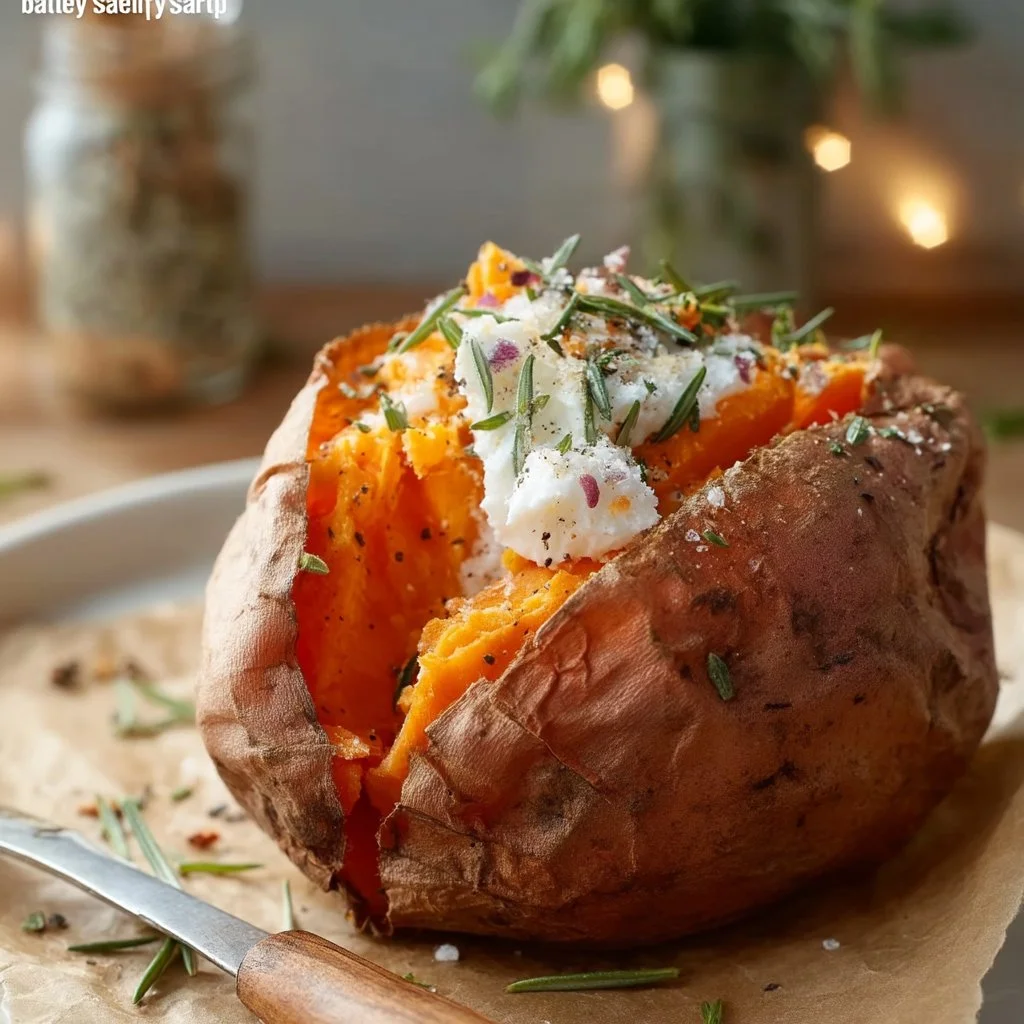
Some nights you just need a dependable carb you can build a meal around—no chopping board, no sauce, no extra pans. A baked sweet potato fits that slot beautifully: it’s hands-off, it uses pantry basics, and it quietly turns into something that feels complete once it hits the plate. I’ll often slide a tray in while I’m pulling together something else, like an oven-baked chicken casserole, and dinner suddenly has structure.
This method is straightforward: hot oven, scrubbed potatoes, a thin coat of olive oil, and a simple salt-and-pepper finish. The payoff is a sweet, fluffy center with a lightly bronzed, seasoned skin. Cleanup is minimal, and the “active” time is basically the five minutes it takes to prep the potatoes.
Why This Recipe Works
- High heat (425°F / 220°C) encourages a fluffy interior while still giving the skin a little color and structure instead of turning leathery.
- A light rub of olive oil helps the skin roast, not dry out, and it makes the salt and pepper stick evenly.
- Fork-piercing prevents steam pressure buildup, so the potatoes bake evenly without splitting unpredictably.
- The baking sheet keeps it practical and contained—no racks, no foil, no extra tools required for this version.
- A flexible 45–60 minute window fits real life: smaller sweet potatoes finish sooner; larger ones need the full hour.
- It’s easy to scale up for meal prep—bake several at once and use them across multiple meals.
Quick Kitchen Note
When I want something warm and reliable that doesn’t require attention, I bake sweet potatoes at 425°F and let the oven do the work; the only thing that really matters is choosing potatoes that feel similar in size so they finish around the same time.
What It Tastes Like
You get a softly sweet, earthy potato with a clean olive-oil richness and a simple savory edge from salt and pepper. The skin takes on a lightly roasted aroma and a gentle chew, while the inside turns tender and fluffy—easy to split open and season further at the table without needing anything fancy.
Ingredients
This recipe is intentionally minimal: sweet potatoes bring the sweetness and structure, olive oil supports a roasted skin and better seasoning coverage, and salt and pepper keep it savory and balanced. If you’re out of olive oil, another neutral cooking oil can work in the same role without changing the method.
- Sweet potatoes
- Olive oil
- Salt
- Pepper

Step-by-Step Instructions
-
Preheat the oven to 425°F (220°C).
This higher heat helps the sweet potatoes bake through while still giving the outside some roast. -
Wash and dry the sweet potatoes well.
Rinse off any dirt, then pat dry. Dry skin + oil = better roasting (and less steaming). -
Pierce each sweet potato a few times with a fork.
Aim for a few pokes on each side. This lets steam escape and helps them cook more evenly. -
Oil and season.
Rub a thin, even layer of olive oil over each sweet potato, then sprinkle with salt and pepper. You’re looking for a light, glossy coat—not a heavy layer. -
Bake on a baking sheet for 45–60 minutes.
Place the sweet potatoes on a baking sheet and bake until they’re tender when pierced with a fork. Timing depends on size:- Closer to 45 minutes for smaller potatoes
- Closer to 60 minutes for larger ones
Visual cue: the skin will look a bit darker and more roasted, and the potato should feel soft when gently squeezed with an oven mitt.
-
Cool briefly, then serve.
Let them sit for a few minutes so the inside settles and you don’t lose steam (or burn your hands) when you split them open.
Common Mistakes to Avoid
- Skipping the dry-off step: wet skins steam in the oven and roast less evenly. Fix: pat the potatoes dry before oiling.
- Not piercing the potatoes: trapped steam can lead to uneven baking or splitting. Fix: give each potato a few fork pricks on multiple sides.
- Under-seasoning the skin: the interior is naturally sweet; the skin needs enough salt and pepper to taste balanced. Fix: season right after oiling so it sticks.
- Pulling them too early: the center can be firm or slightly stringy if they’re not fully tender. Fix: use a fork test—if it meets resistance, keep baking.
- Baking wildly different sizes together: small ones overcook while big ones lag behind. Fix: choose similar-size potatoes, or remove smaller ones as they turn tender.
Variations and Swaps
Keep the method the same and adjust only what makes sense for this exact bake:
- More or less oil: Use just enough olive oil to lightly coat; extra oil will encourage a richer, more roasted skin.
- Pepper-forward finish: Add a more generous grind of black pepper before baking for a sharper, slightly spicy edge.
- Batch baking: Bake several sweet potatoes at once on the same sheet for grab-and-go meal components (same temperature and timing; just expect the full range depending on size).
To turn it into a fuller plate, I’ll often pair a baked sweet potato with something already going in the oven, like an oven-baked chicken parmesan, so dinner shares the same heat and timing.
Serving Suggestions
- Split and fluff the inside with a fork and serve as-is when you want a simple, clean side with a little seasoning already built in.
- Make it the base of a bowl: a baked sweet potato works as a warm foundation under whatever you’re meal-prepping that week.
- Add a savory breakfast angle: pair with creamy baked eggs for a low-effort, oven-friendly combo that feels substantial without extra stovetop work.
Storage and Meal Prep
- Refrigerate: Let baked sweet potatoes cool, then store them in an airtight container in the fridge. They’re great to have ready for quick lunches.
- Reheat: Warm in the oven until heated through, or reheat gently until the center is hot. If you want the skin to feel more roasted again, the oven is your best bet.
- Meal prep note: Bake a few at once and keep them whole until you’re ready to eat—this helps the inside stay moist and prevents them from drying out.
FAQs
How do I know when a sweet potato is fully baked?
When a fork slides in easily with little resistance. The potato should also feel soft when gently squeezed with an oven mitt.
Can I bake more than one at a time?
Yes—just keep them on a baking sheet with a little space. Try to use similar-size potatoes so they finish together.
Why do I need to pierce them with a fork?
It gives steam a way out, which helps them bake more evenly and prevents pressure from building up inside.
Mine took longer than 60 minutes—what happened?
It’s usually size. Larger sweet potatoes can push past the hour. Keep baking until the fork test says they’re tender.
Final Tip
If you’re baking multiple sweet potatoes, start checking the smallest one first around the 45-minute mark—pull any that are fork-tender and let the larger ones continue, so everything finishes at its best texture instead of overbaking the smaller potatoes.
Conclusion
If you want to compare approaches and see how other cooks handle timing and texture, these guides are worth a quick read: baked sweet potato basics, crispy-skin baked sweet potatoes, and the easiest method for baked sweet potatoes. When you’re keeping dinner simple, having one reliable oven staple like this makes the rest of the meal easier to improvise—whether you’re serving it on the side, building a bowl, or prepping a few for the week ahead.
And if you’re planning a full oven lineup, I’ll sometimes add something sweet while the oven’s still hot—one tray meal energy—like oven-baked cool whip cookies as a separate batch afterward.